In the Doghouse
I’ve now been home almost a month since returning from the chilly wastes of Svalbard (where all the Polar Bears hid until they saw my plane leave, then started dancing on the ice for my shipmates) to the soggy wastes of Argyll, and since then have made some good progress in some interesting projects. First of all, as promised at the end of my last post, the mainmast arrived just before I went away at the beginning of May, and is currently lying in the shed at Kilmelford whilst the mast shelter end of the dinghy compound is rebuilt.
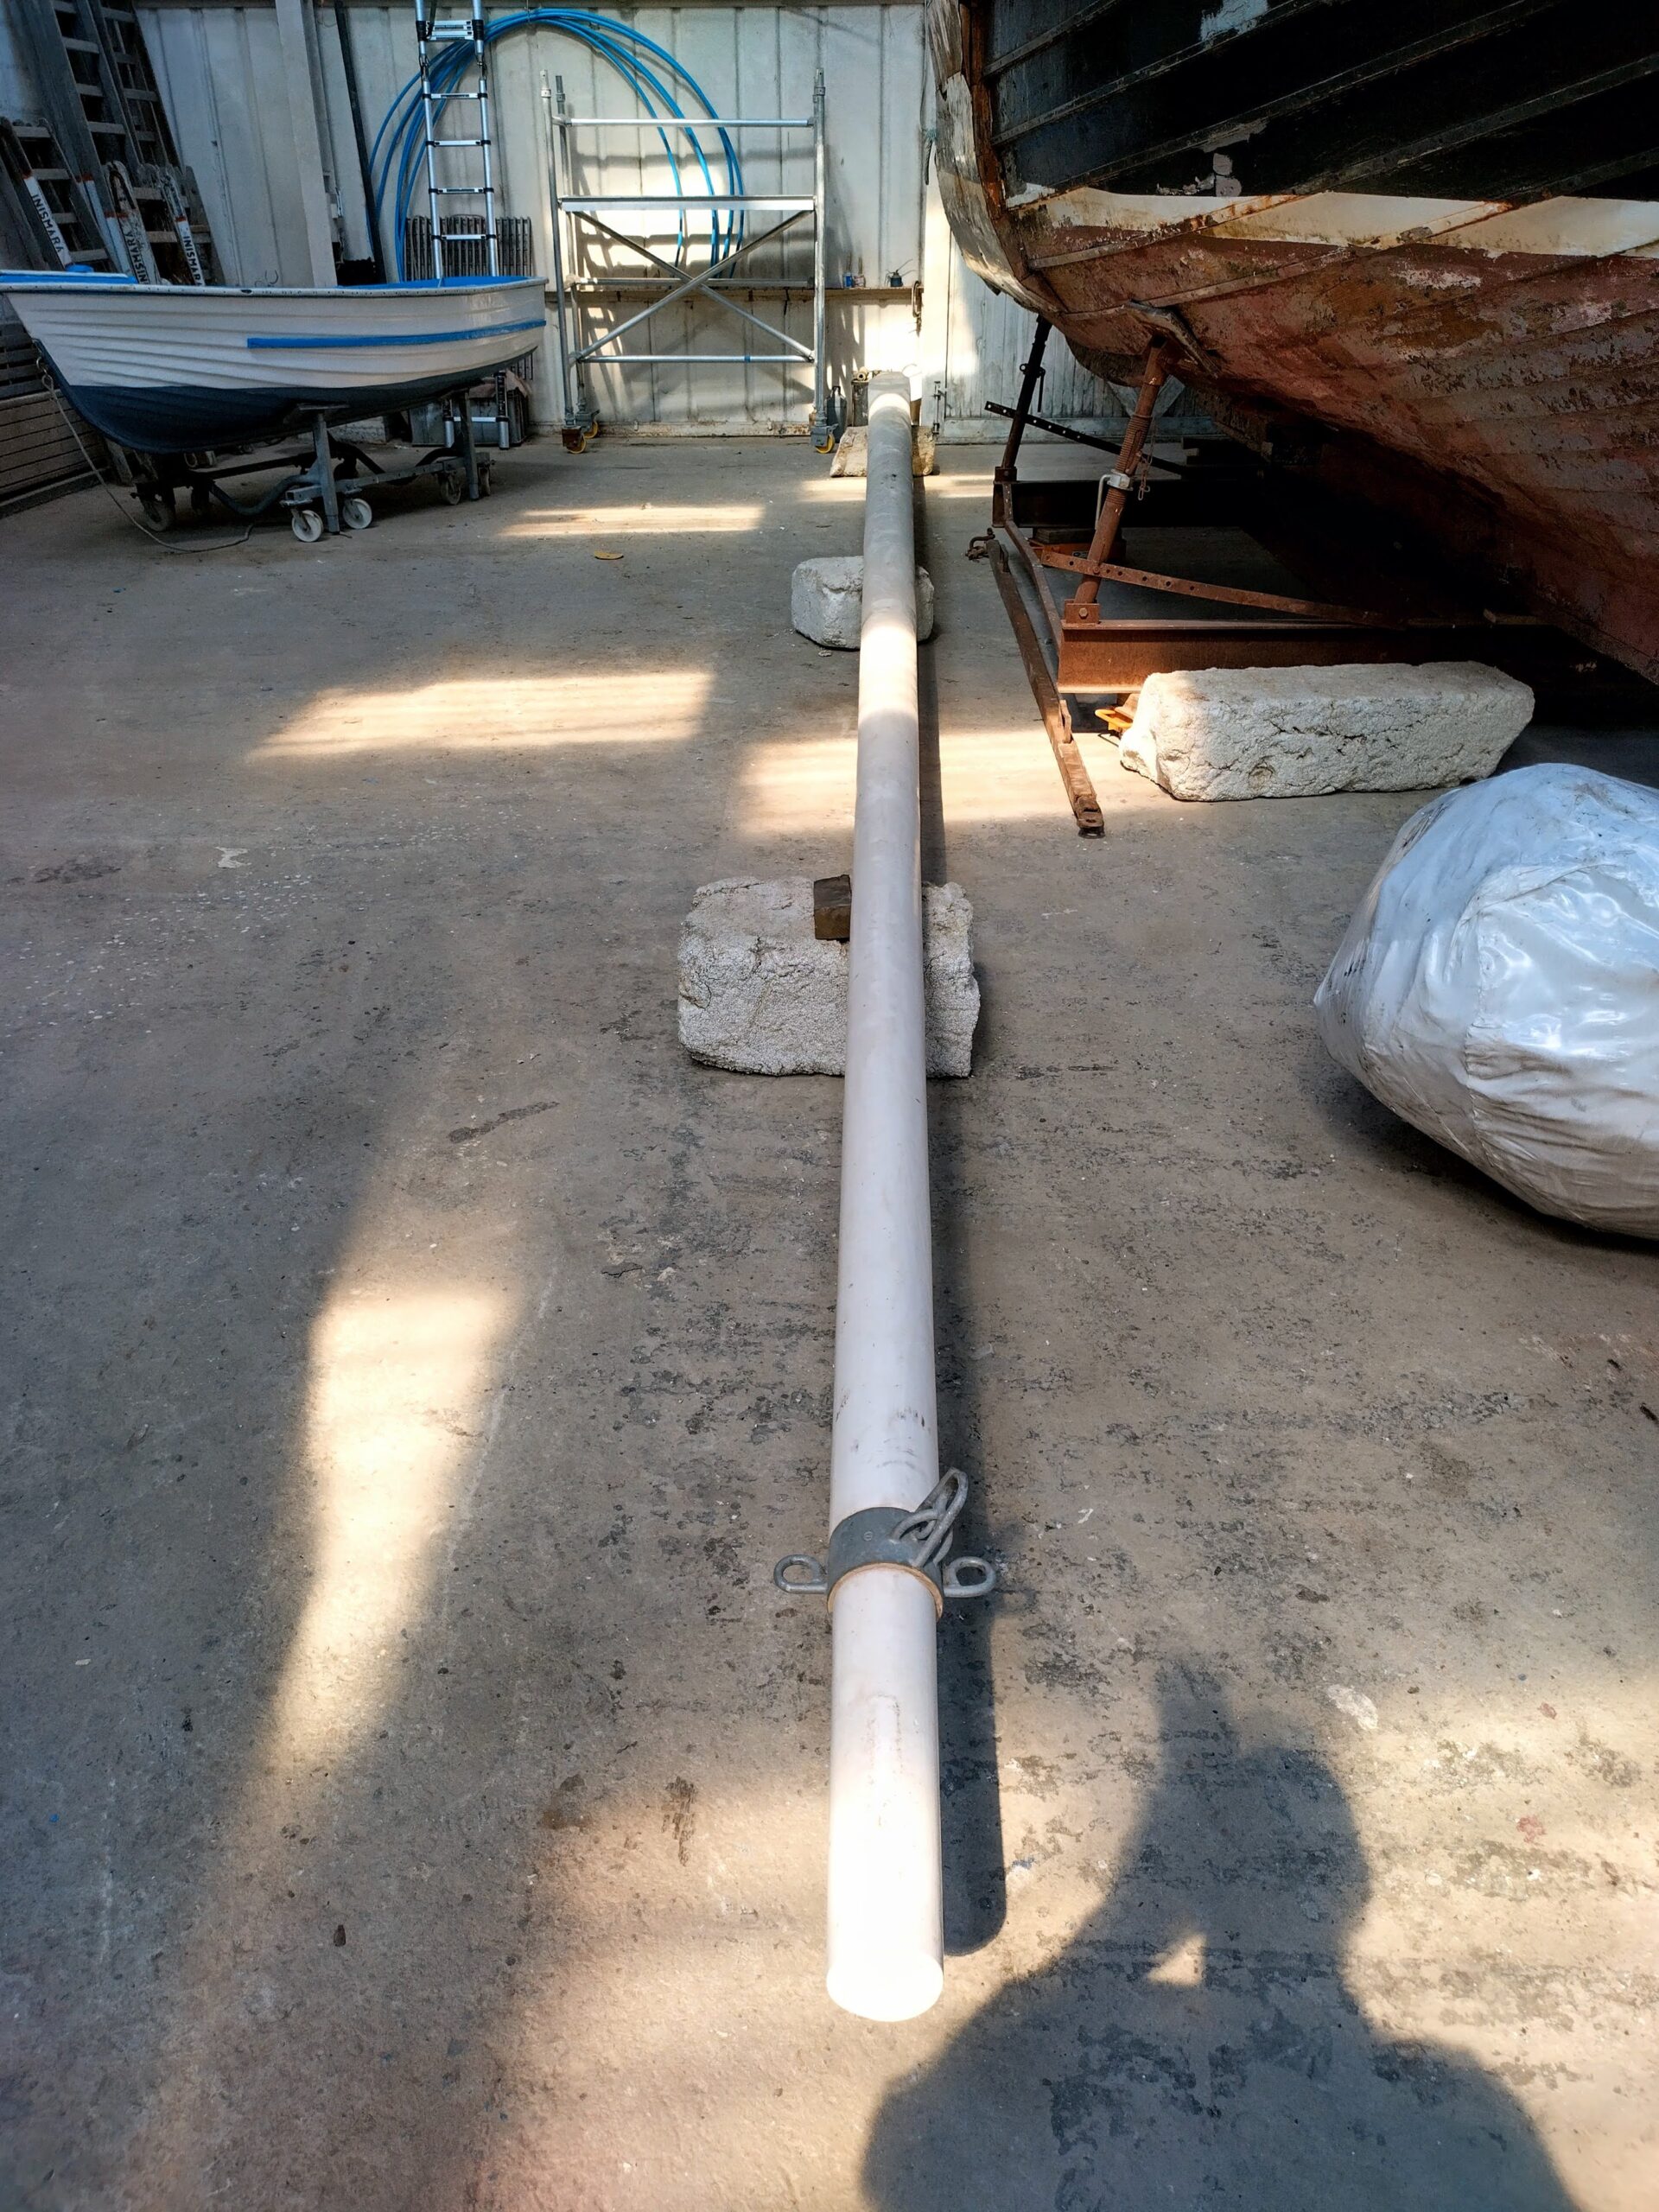
This is a great achievement, and I am pleased to have found the mast for sale, as it will save me a huge amount of time in not having to build my own! It does need a couple of alterations, mainly rounding the bottom end so it goes through the circular partner collar, and running a cable channel down so I can install lights / aerials at the masthead, as well as altering the masthead fitting for lights and aerials and moving it the 40cm up to the very tippy-top of the mast. The mast is technically 40cm shorter than the one I designed, but I think we can get away with that and still have enough space for the halyard at the masthead.
Also just before my departure last leave I took delivery of all the fuel hose I should need for my fuel systems – supply, return, filling, vents and transfer, so at some point I can look at installing these, although first I will need to alter the nipples on the keel tank lids to fit my planned systems – a bit of grinding and welding required unfortunately.
This month I have been alternating boatbuilding with a couple of weeks as skipper on the puffer VIC 32, as well as trying to get someone in to attend to the tidying and painting of the front of my house. I also have in the first half of August a 12-day trip on Tenacious as relief Master, so lots of fun to look forward to, as well as some extra funds (which should pay for the bulk of the house repairs!).
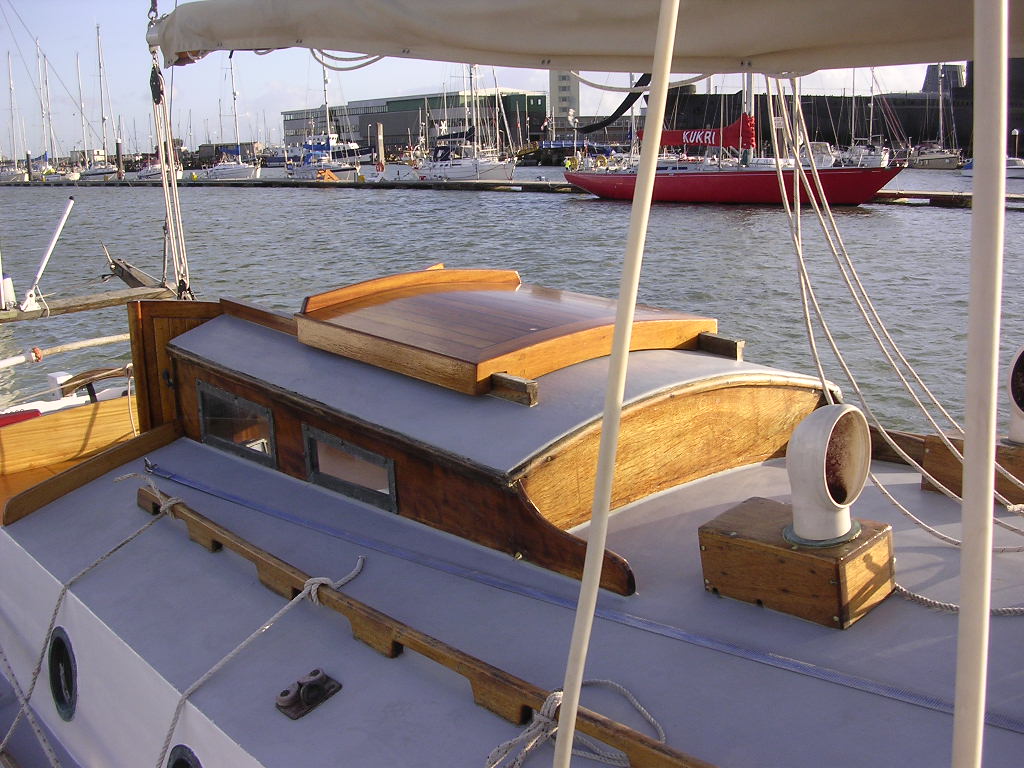
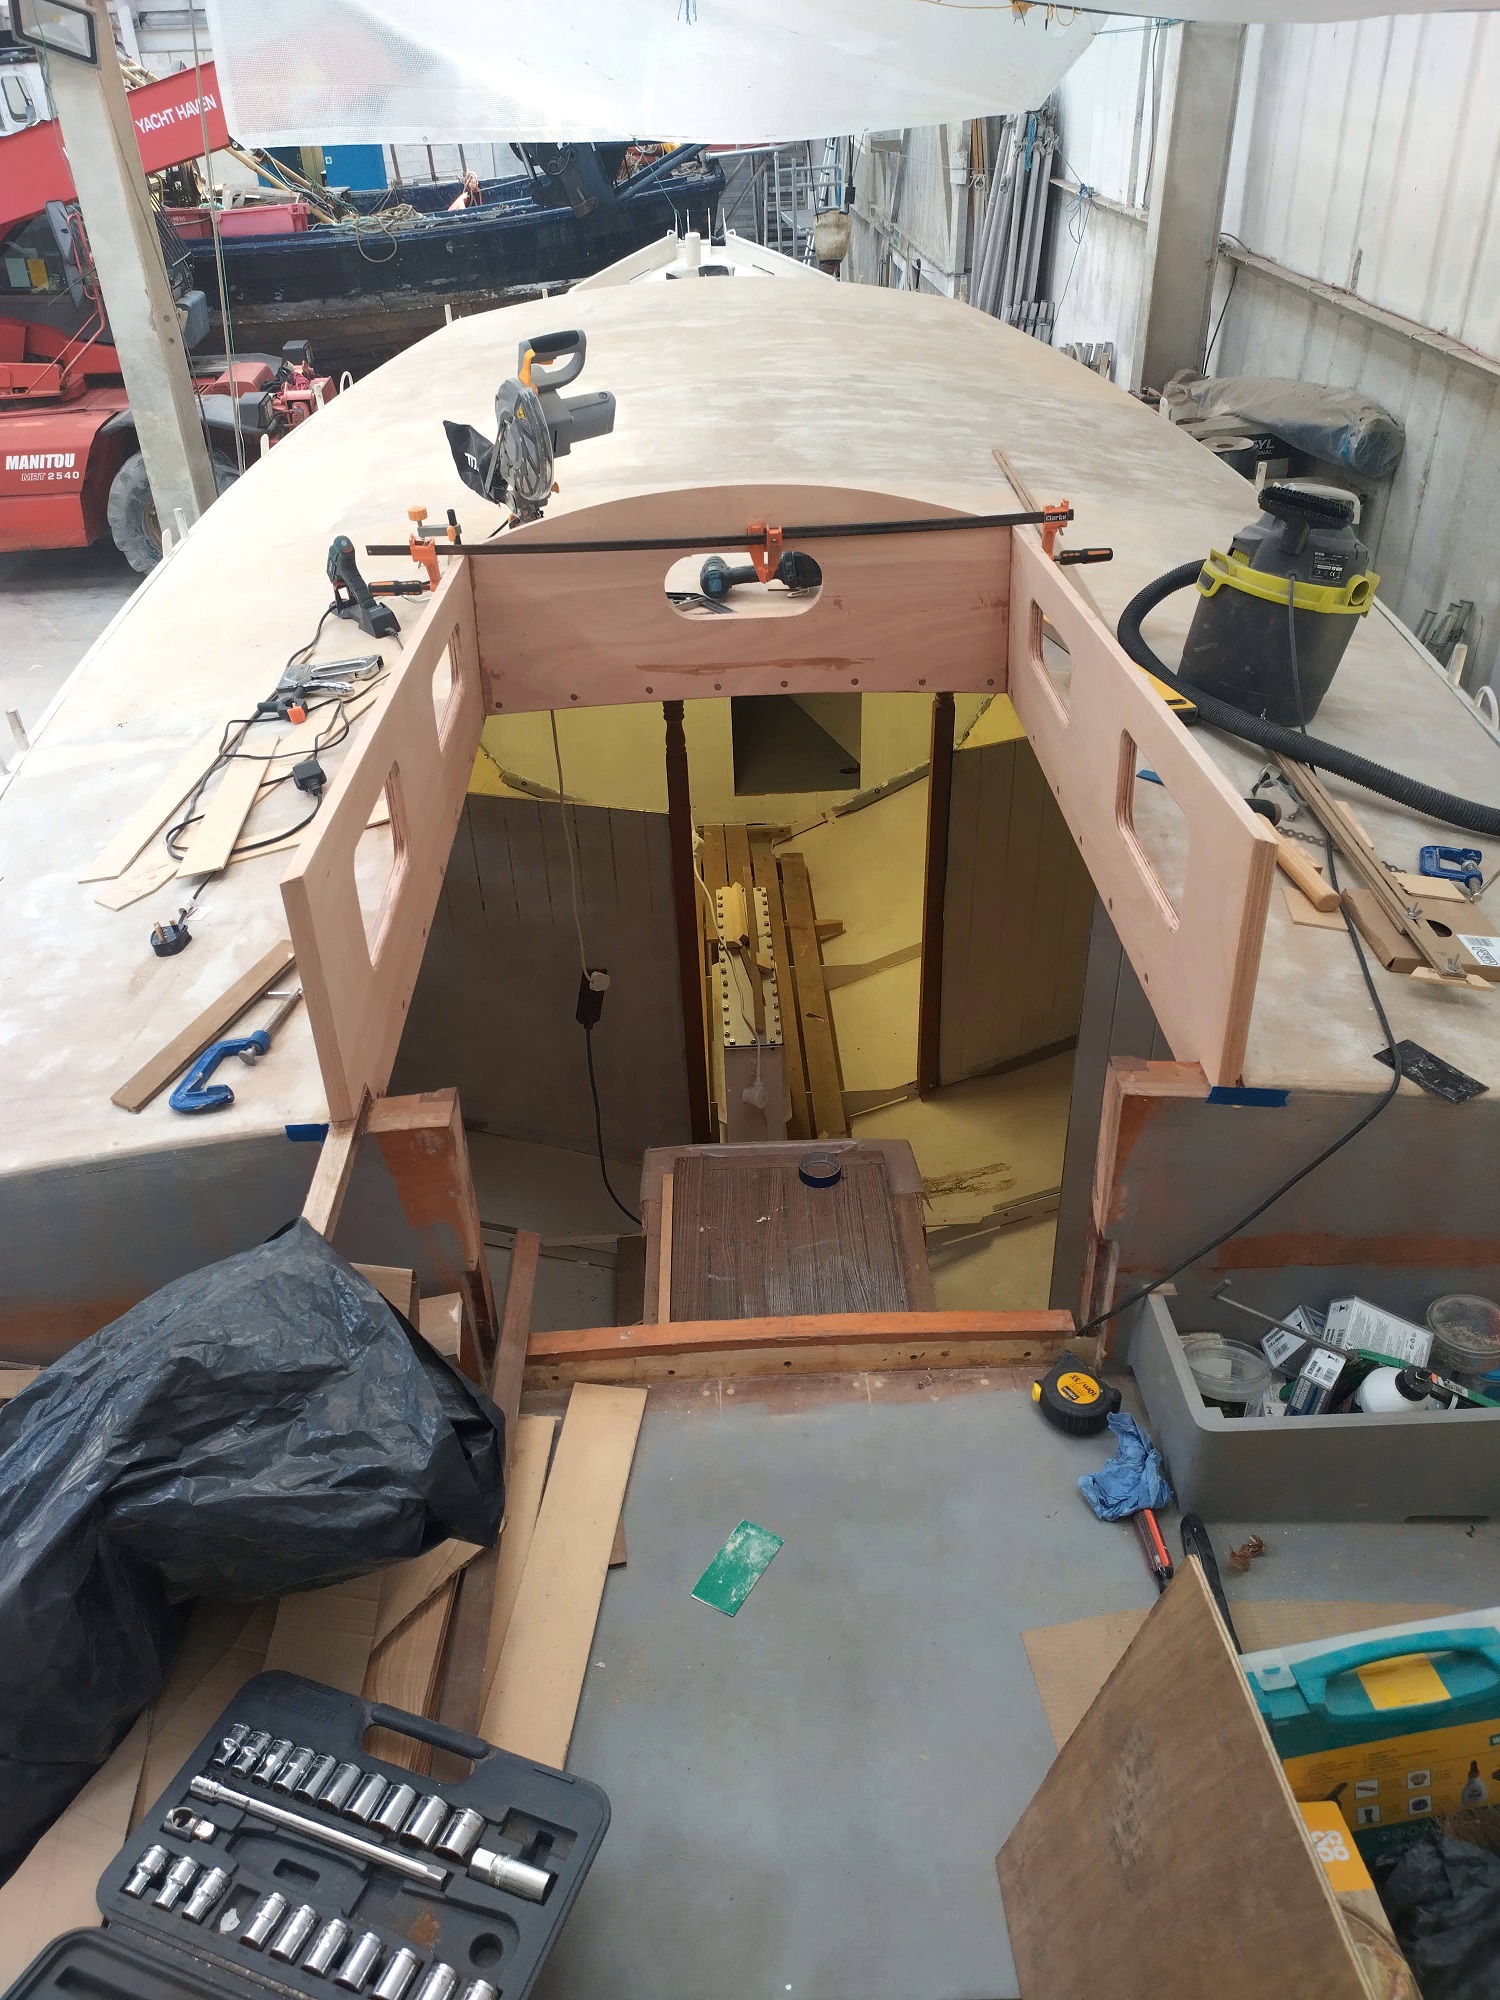
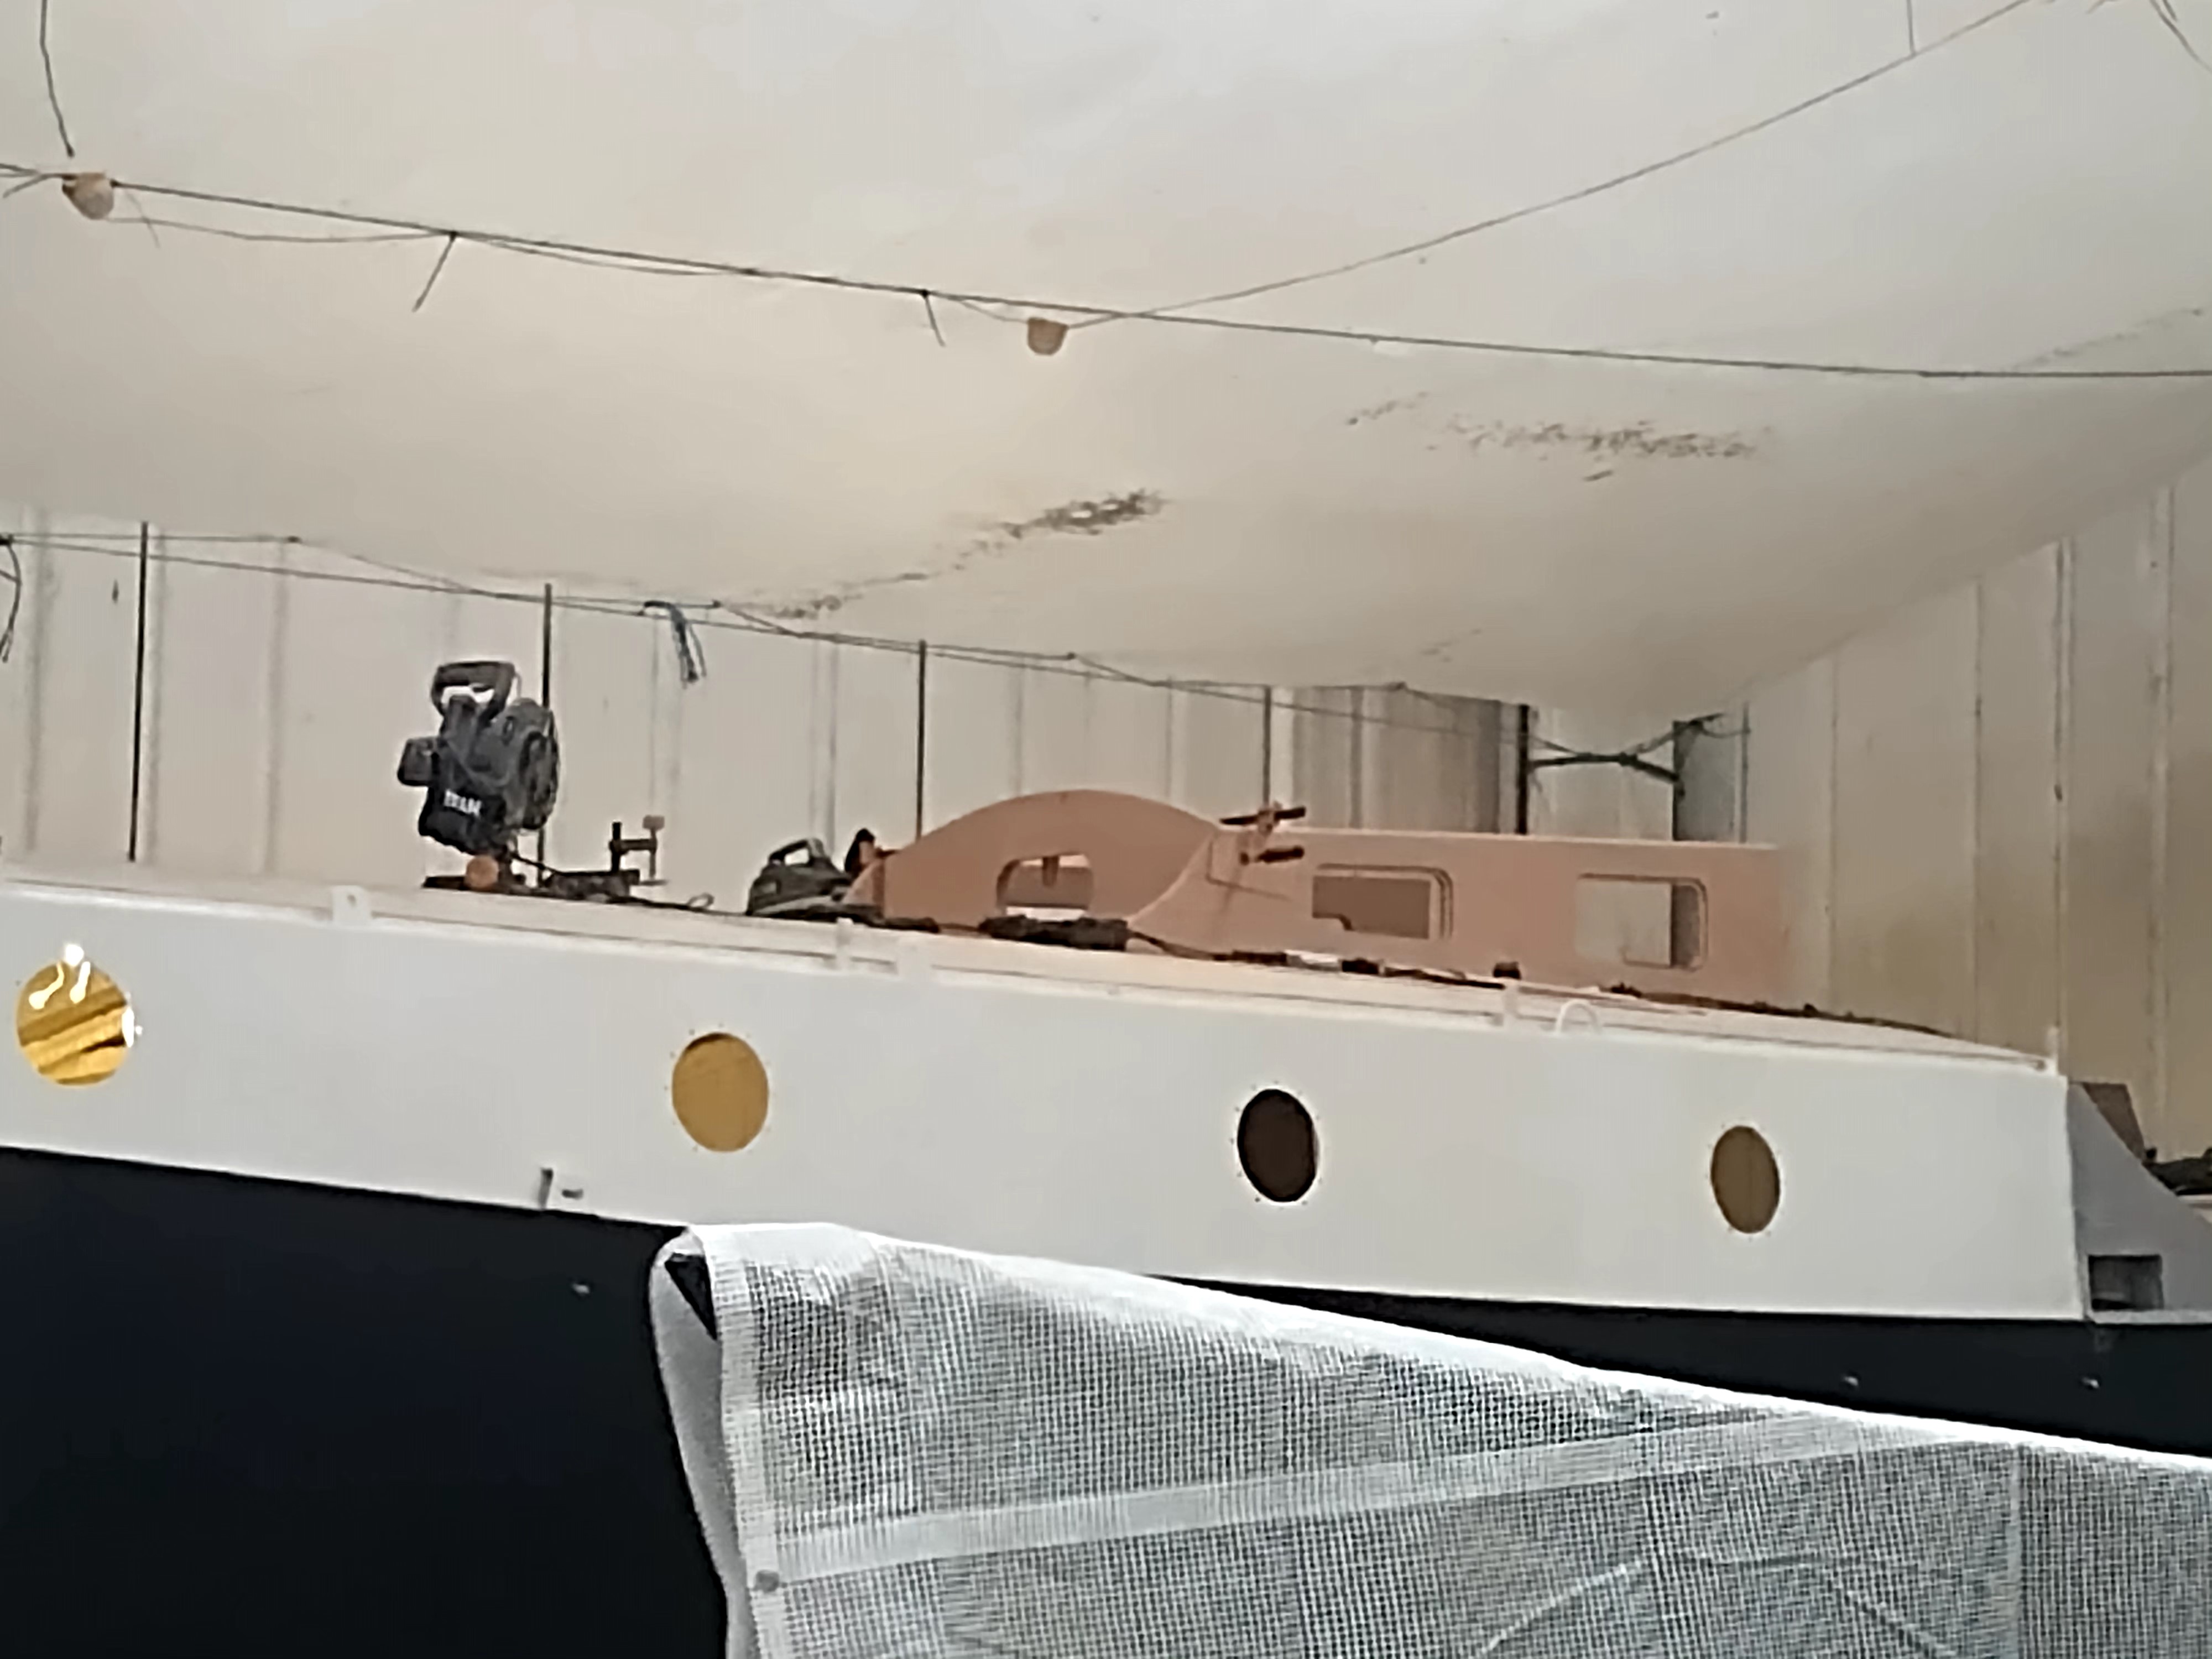
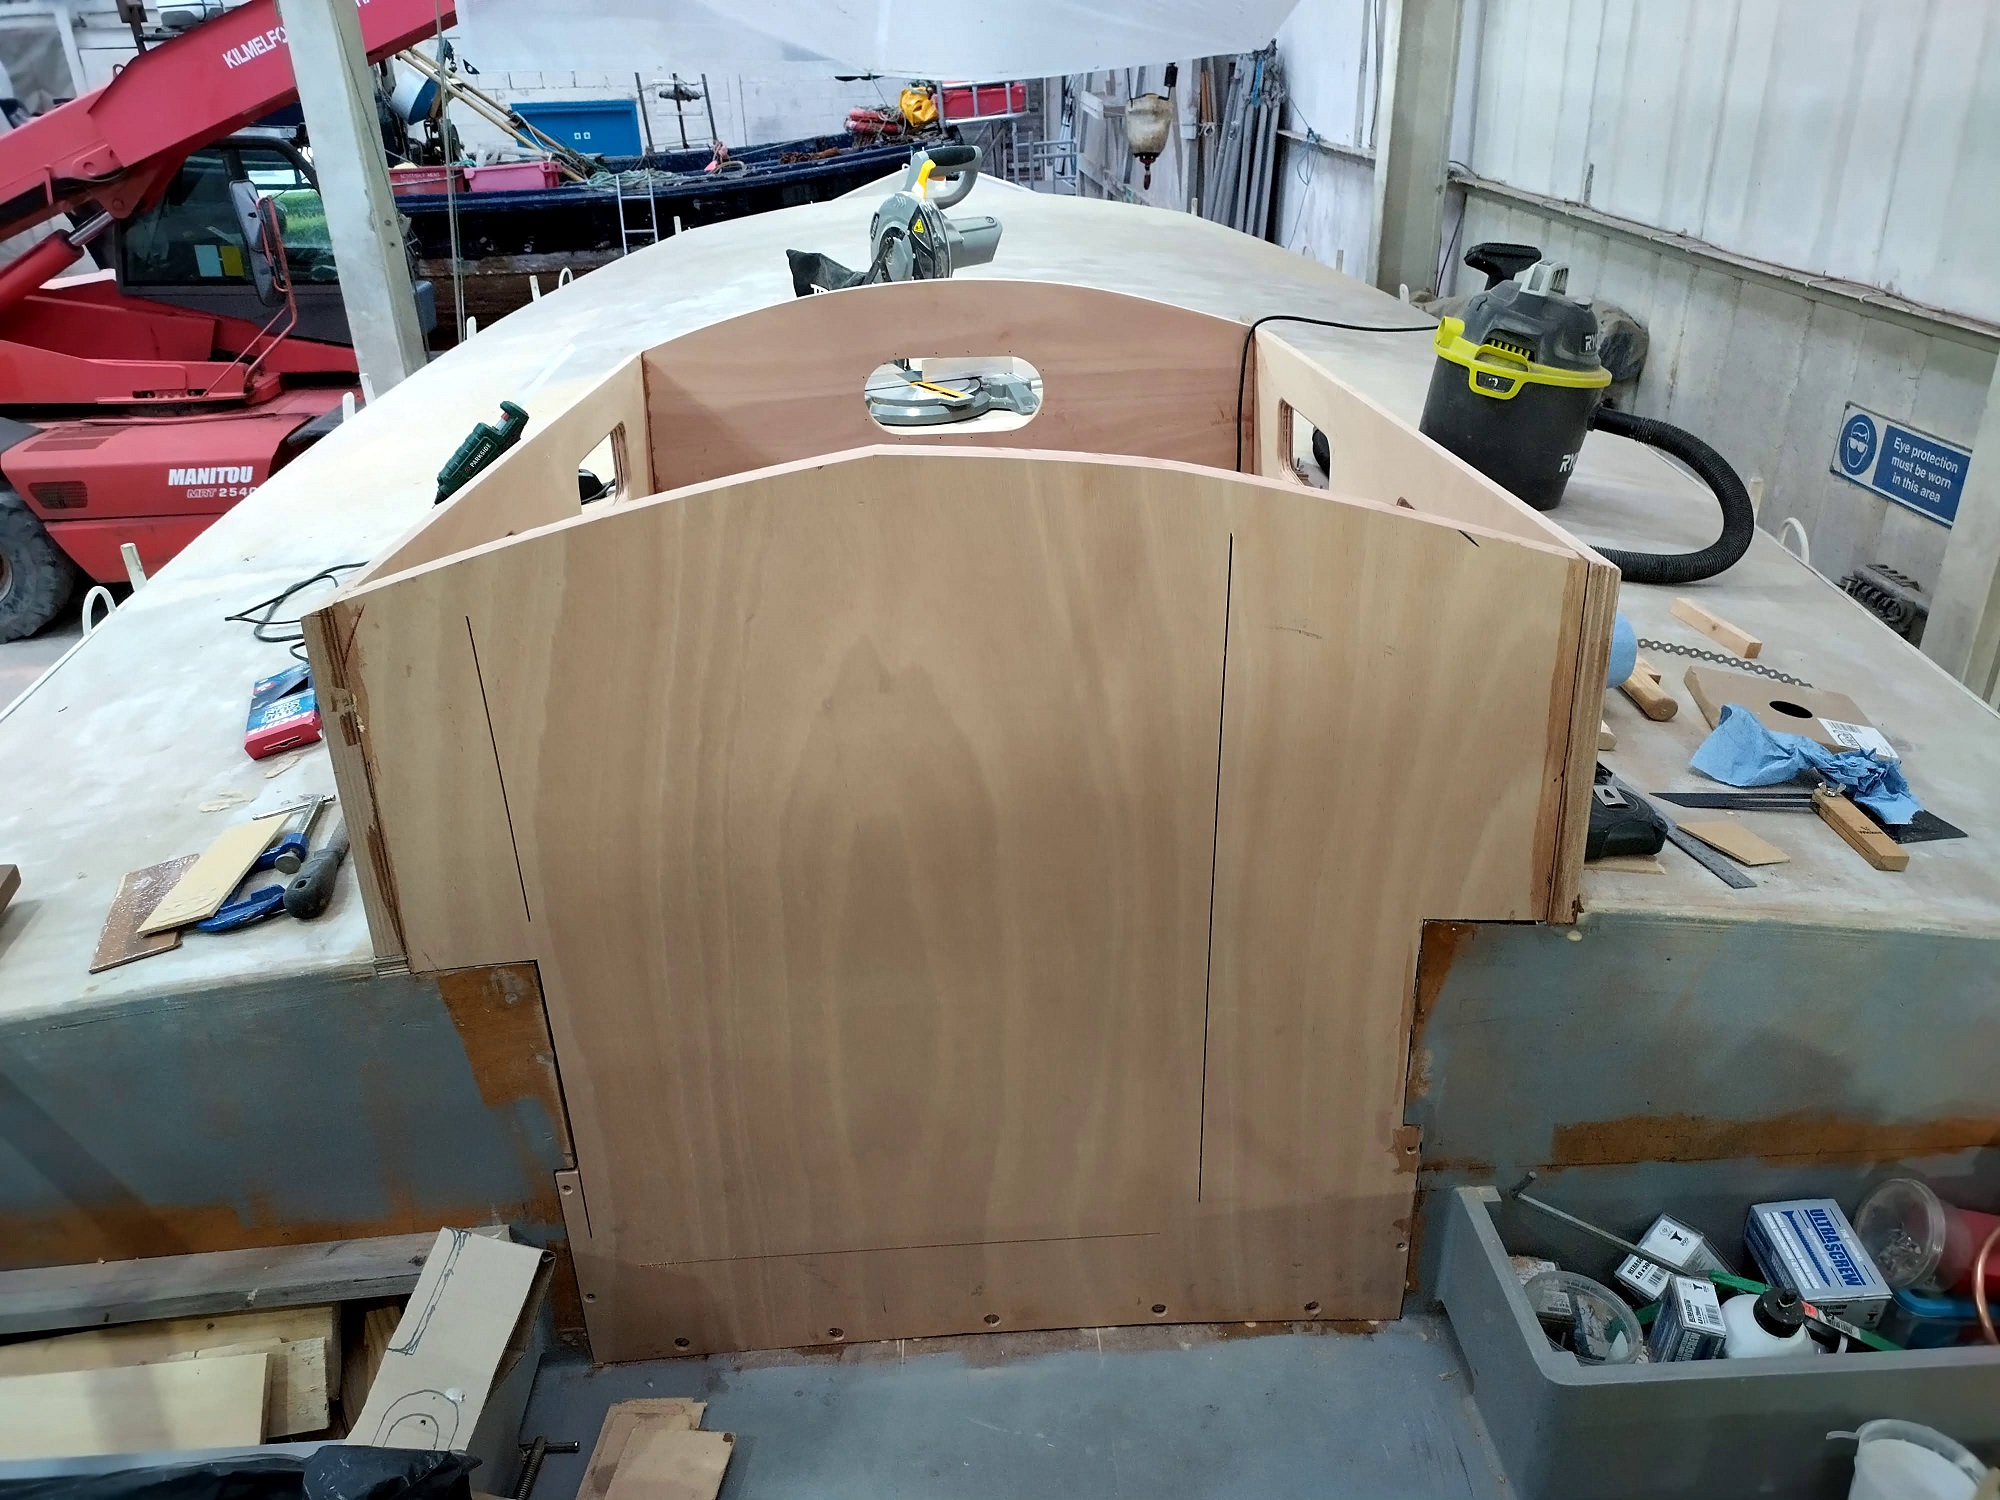
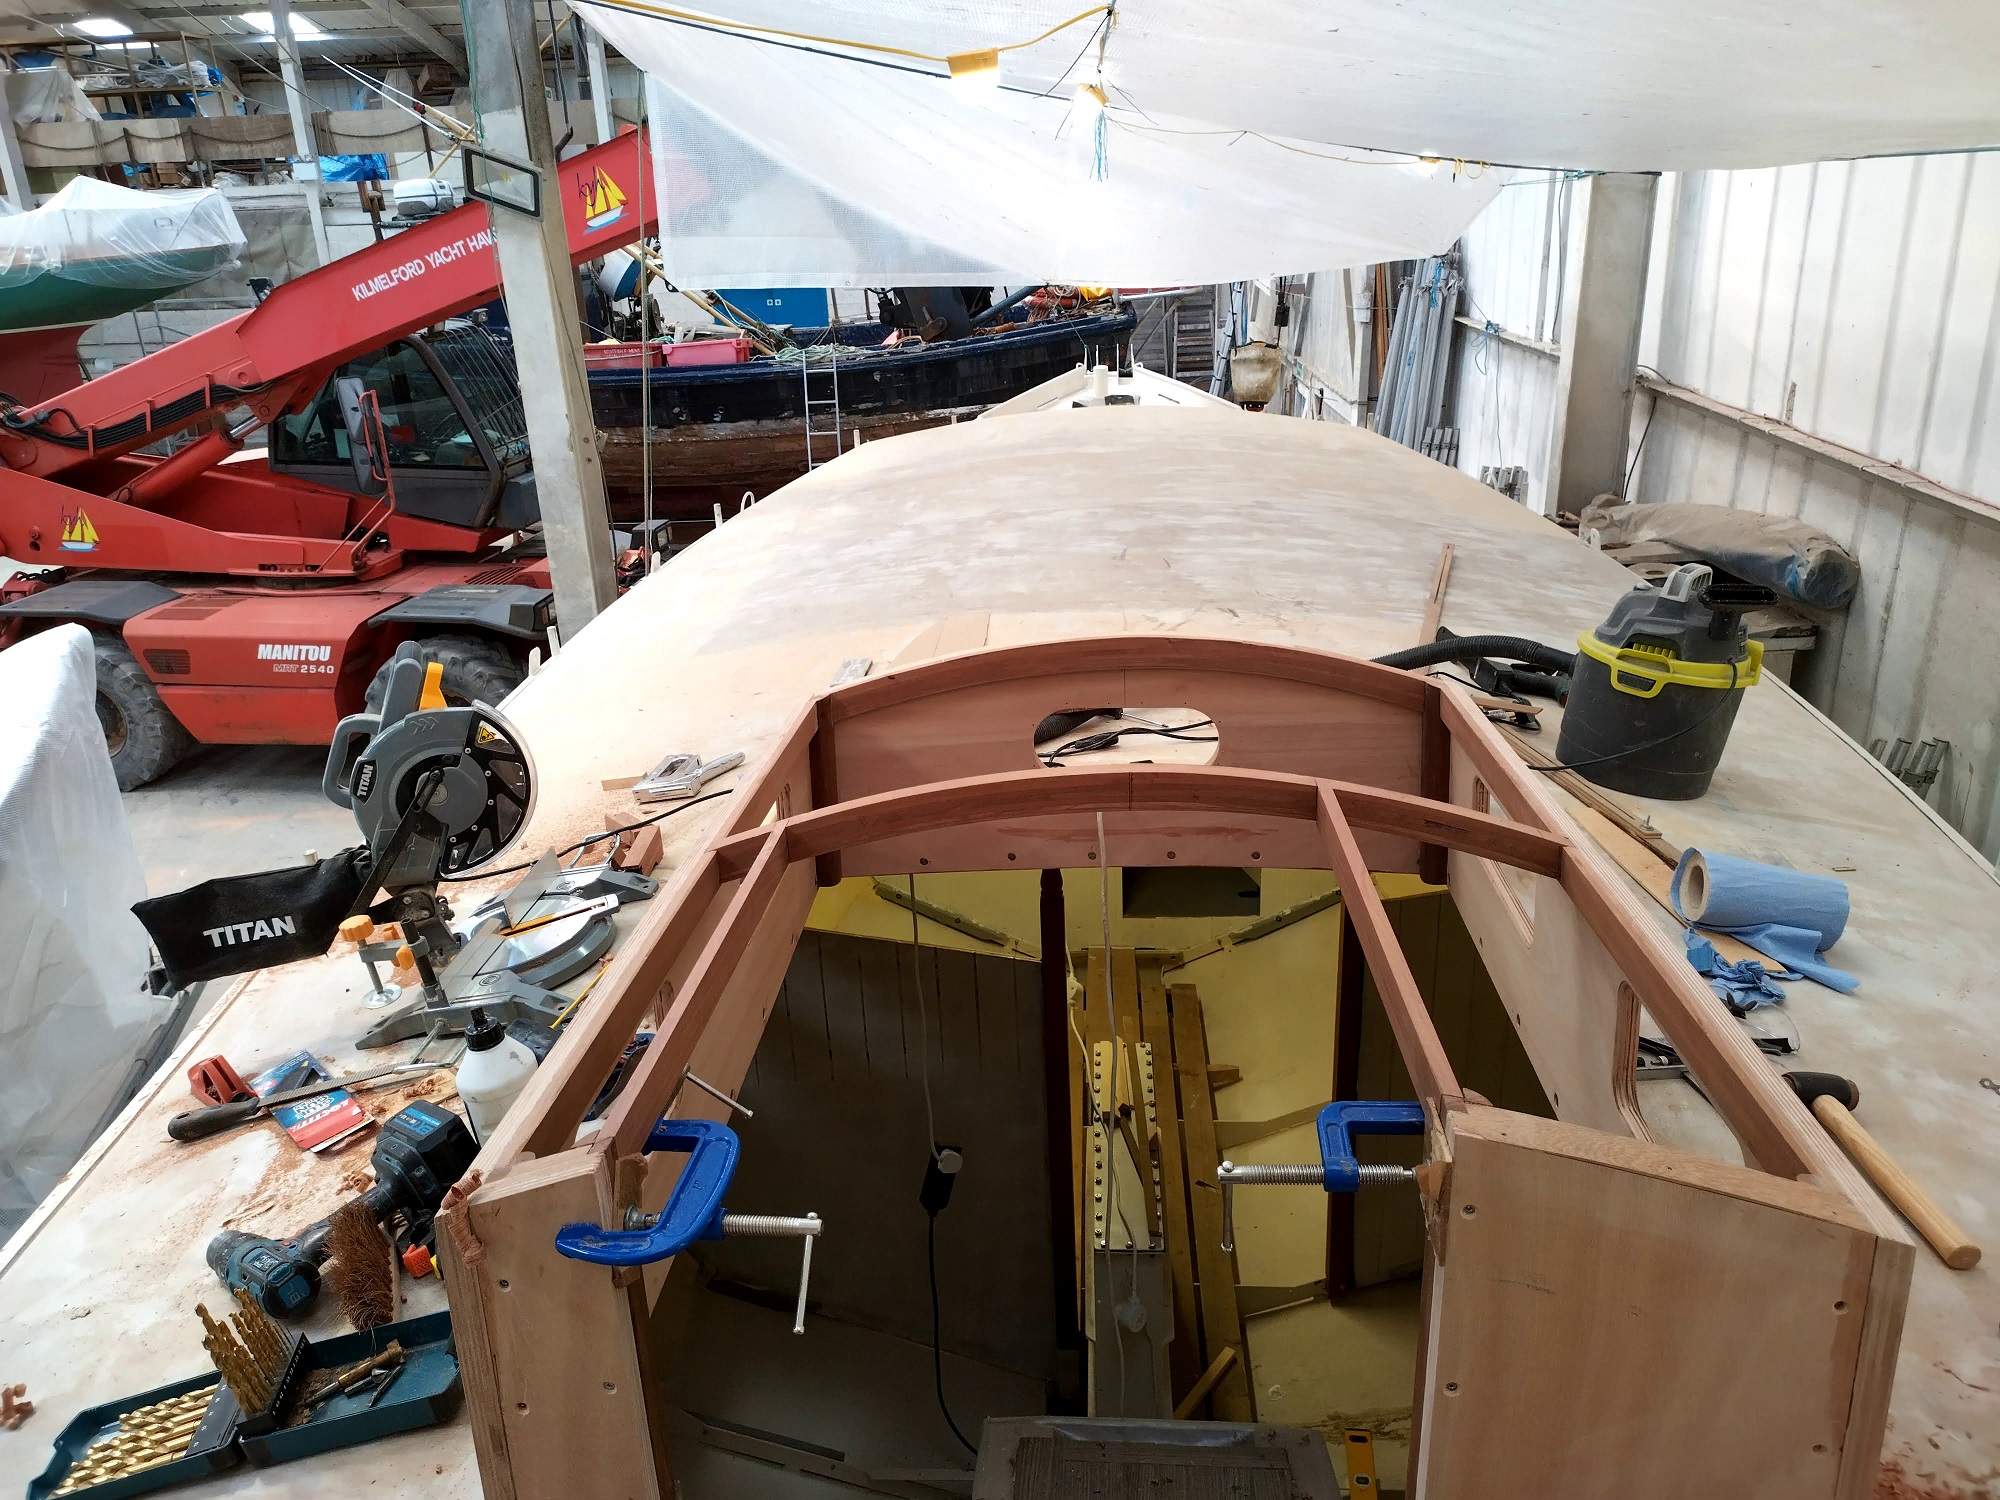
I started in early July by deciding that it was time to tackle the manufacture of the doghouse, whilst the weather is warm for epoxying and so that I can then fit one of the last remaining internal partitions alongside the companionway, dividing off the aft cabin and forming part of the engine box. This doghouse is modelled on the lovely solid hardwood one which I had on Mintaka, my old Maurice Griffiths Waterwitch – a simple structure with an attractively raked roof, trapezoid windows and a nice curve to the forward end of the side pieces.
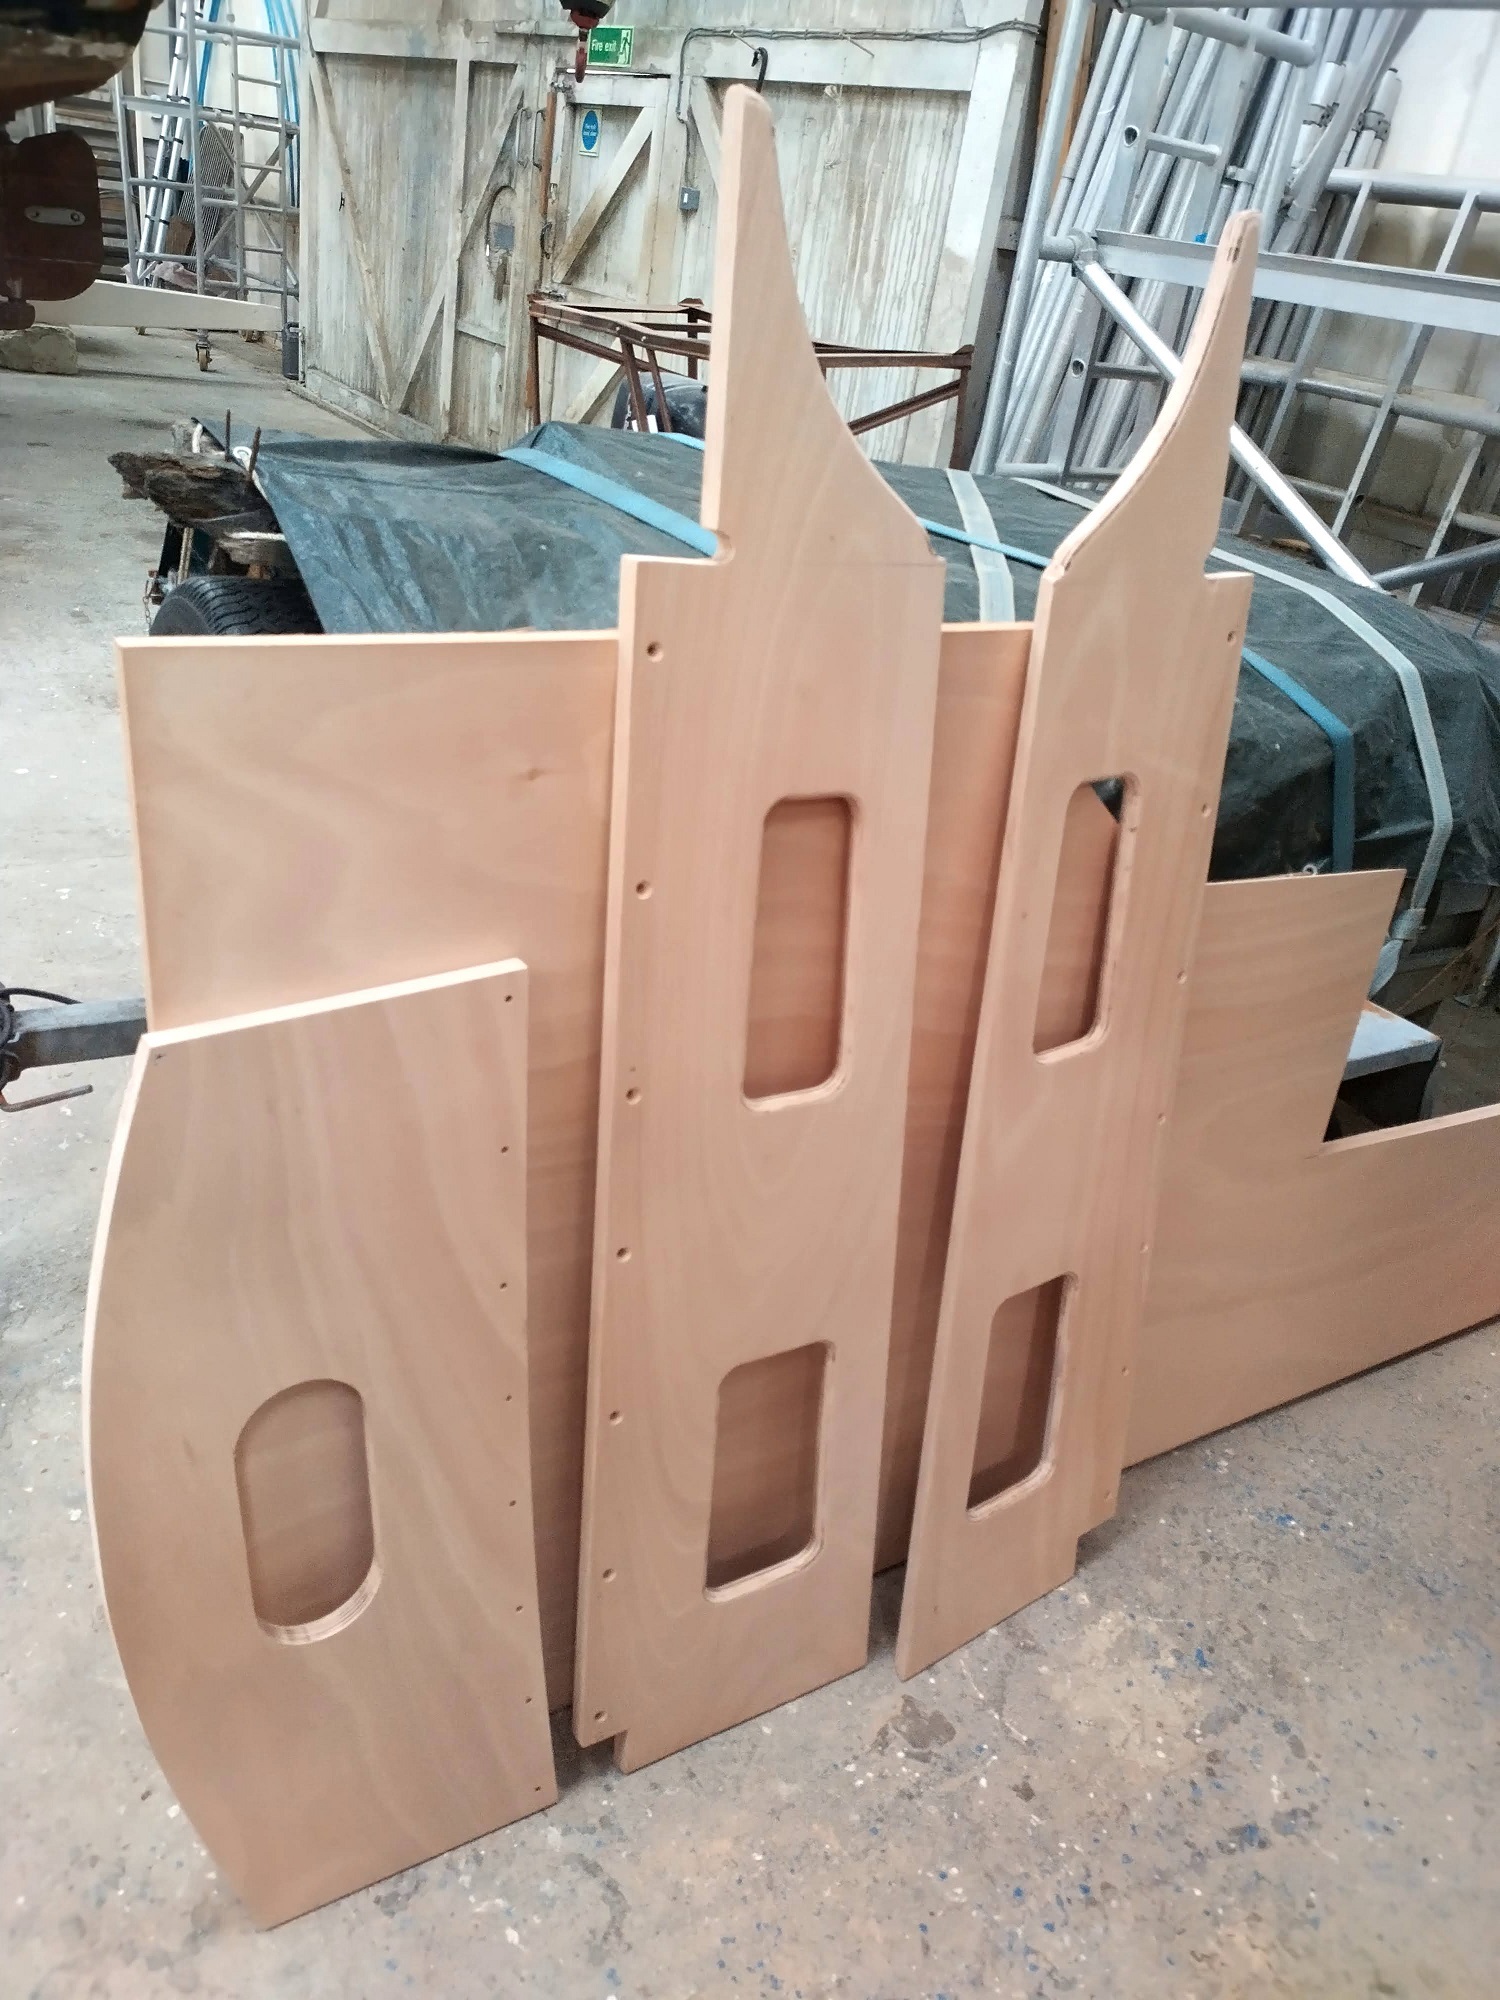
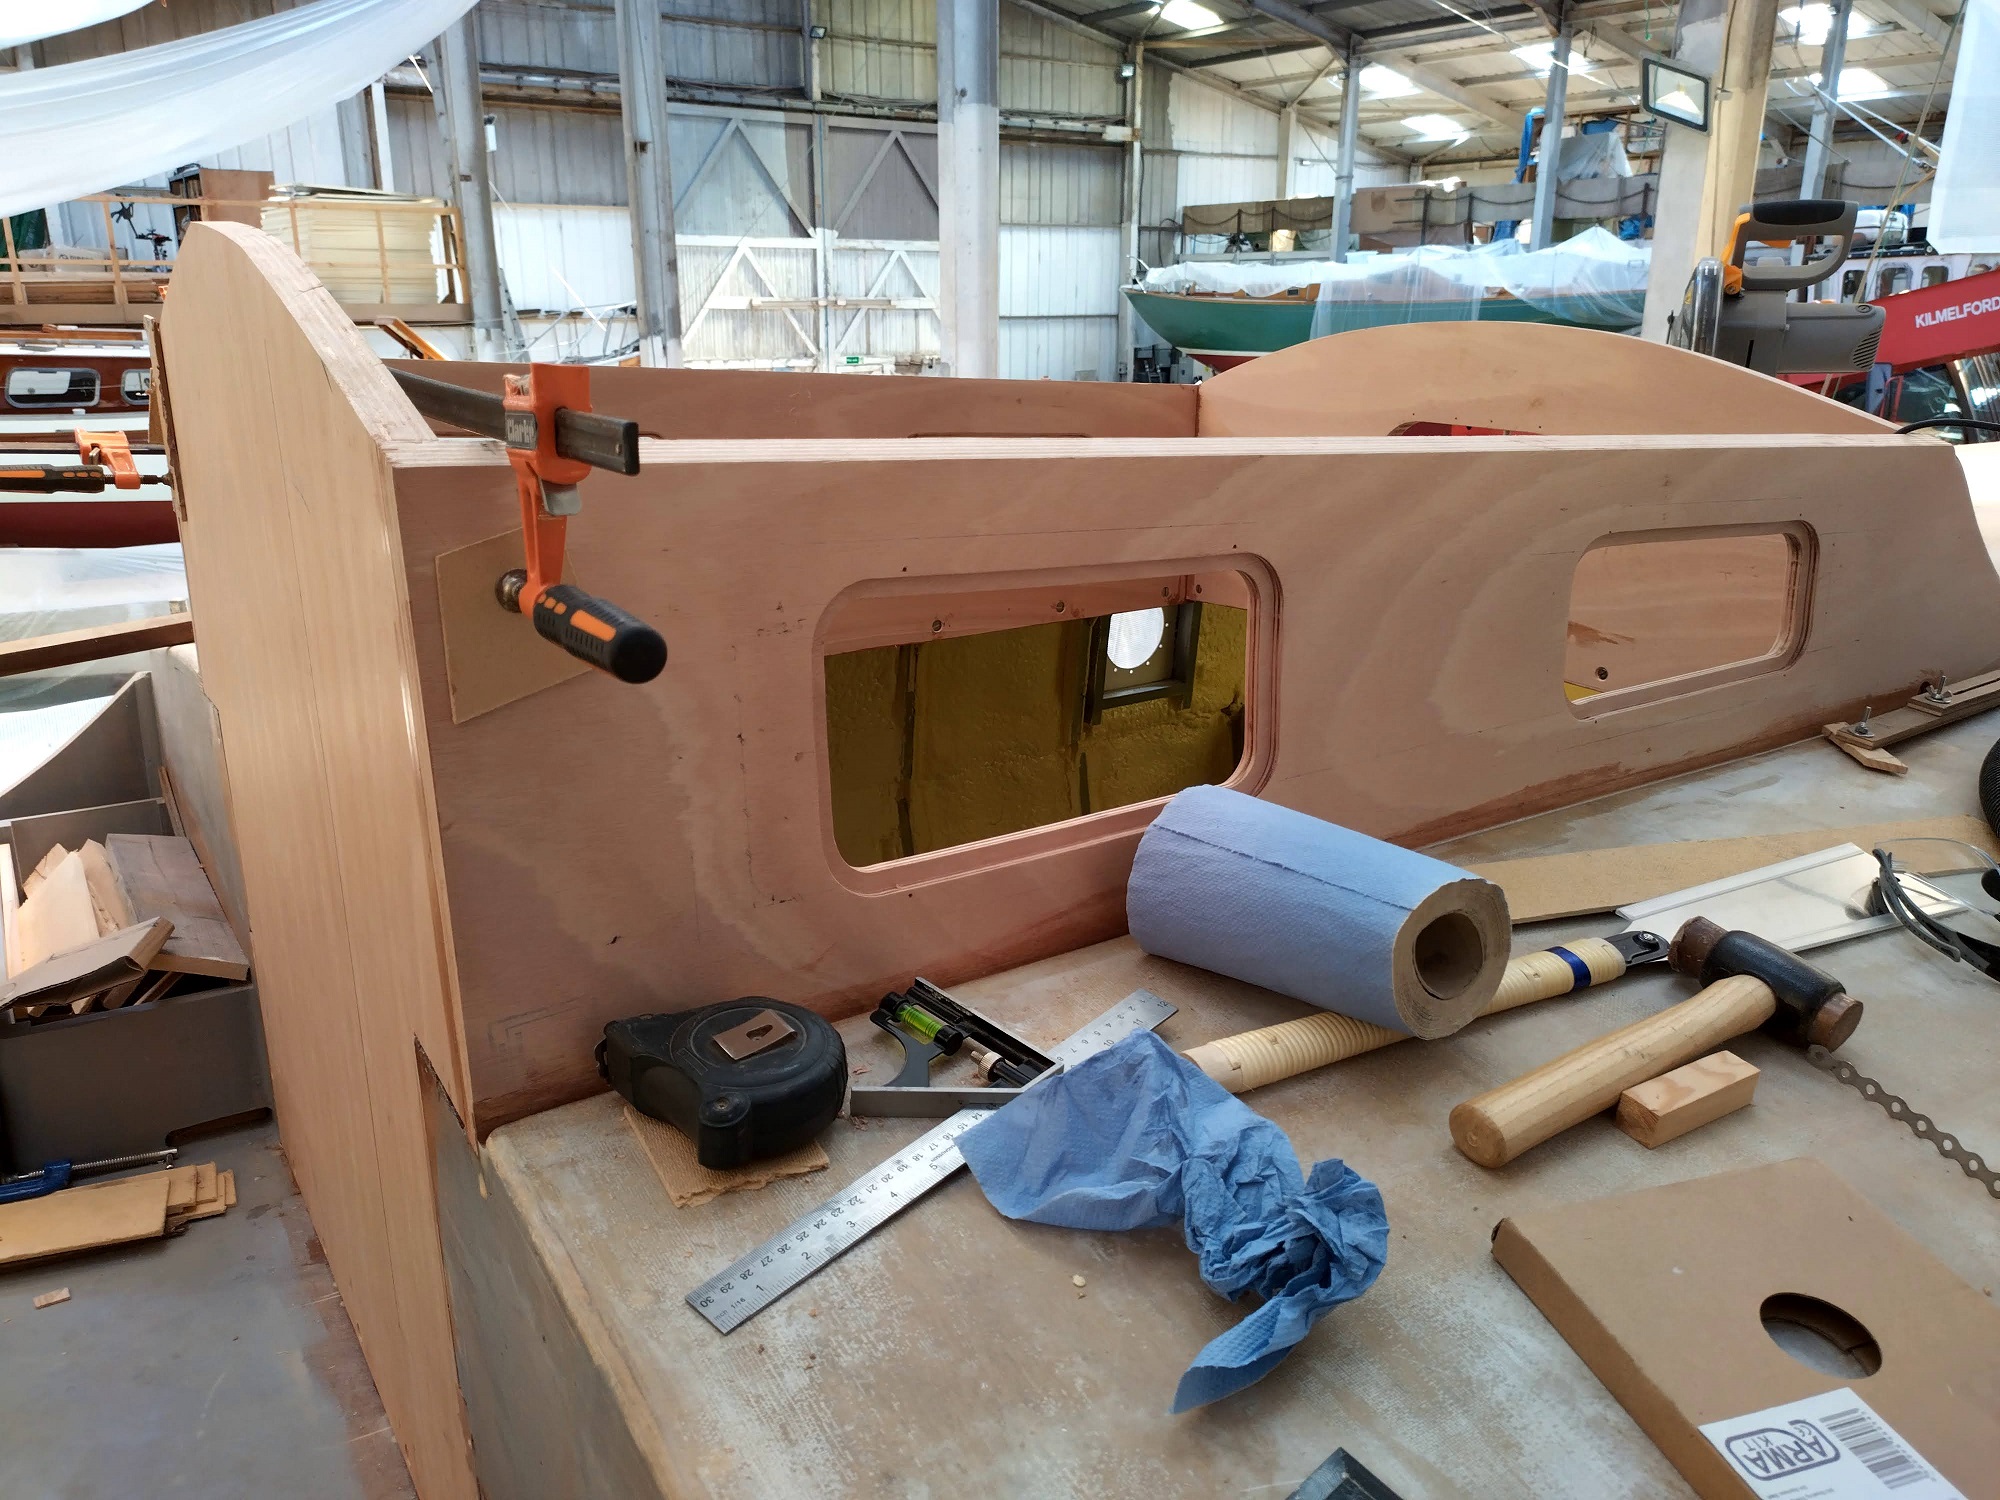
Having roughed out some cardboard templates a couple of years ago, after removing the old excrescence of a doghouse and filling in parts of the opening, the design of the house was pretty complete in my mind, and I just needed to make it a reality out of 25mm marine ply! I started by cutting one side piece, and ensuring it fitted in the right position and attitude before using it as a template for the second. Somehow there ended up being a 10mm discrepancy between the length of the two sides, but that was fairly easily absorbed and will not be noticeable in the final structure. Once the sides were cut to shape, I clamped them in place to ensure they had the correct toe-in angle of approximately 2 degrees, before making a hardboard template for the forward face, including the correct camber for the roof. This too, once cut, was dry fitted, then all three pieces trimmed and planed as nicely as possible. I also drew on the window shapes where I had had them on the cardboard template, and having decided the aft one was 5cm too far aft, redrew them before committing myself to cutting and trimming them before routing out the rebate for the window glass (8mm toughened glass, to be ordered), and rounding the inside edge for aesthetic purposes. Whilst doing this, I also manufactured templates to be used for the 18mm plywood window frames, so I don’t need to come back and do this later when the doghouse is already in place. I will order the glass once I have finished my current enormous box of Shreddies and can use the cereal box for templates for the glass shapes, to send to the supplier.
Once these stages were complete I could then dry fit the three parts again, and drill holes for the bolts through the sides into the carlines (and screws into the fwd carline, due to it being bonded to a steel deck beam). Holes drilled and countersunk, the bullet was bitten and I mixed a pot of thickened epoxy and assembled and glued / bolted / screwed the three faces in place, clamping the forward corners together. These corners were initially just glued, but later would be reinforced with corner posts and all glued and screwed together – more on this is coming up.
Once the first bits were in place and the epoxy cured, all clamps were removed and I then made a very complex template for the aft face. This is complex because of how the previous doghouse was constructed and then cut out, as well as because I have opted to have a slightly off-centre companionway. Once the template was complete, I transferred the outline and the aperture for the companionway onto 25mm ply and started cutting the basic shape. I also cut the outline of the companionway opening most of the way round, leaving tabs in the corners to maintain the shape until it was all glued in place, then I could cut the tabs and reveal the final hatch opening.
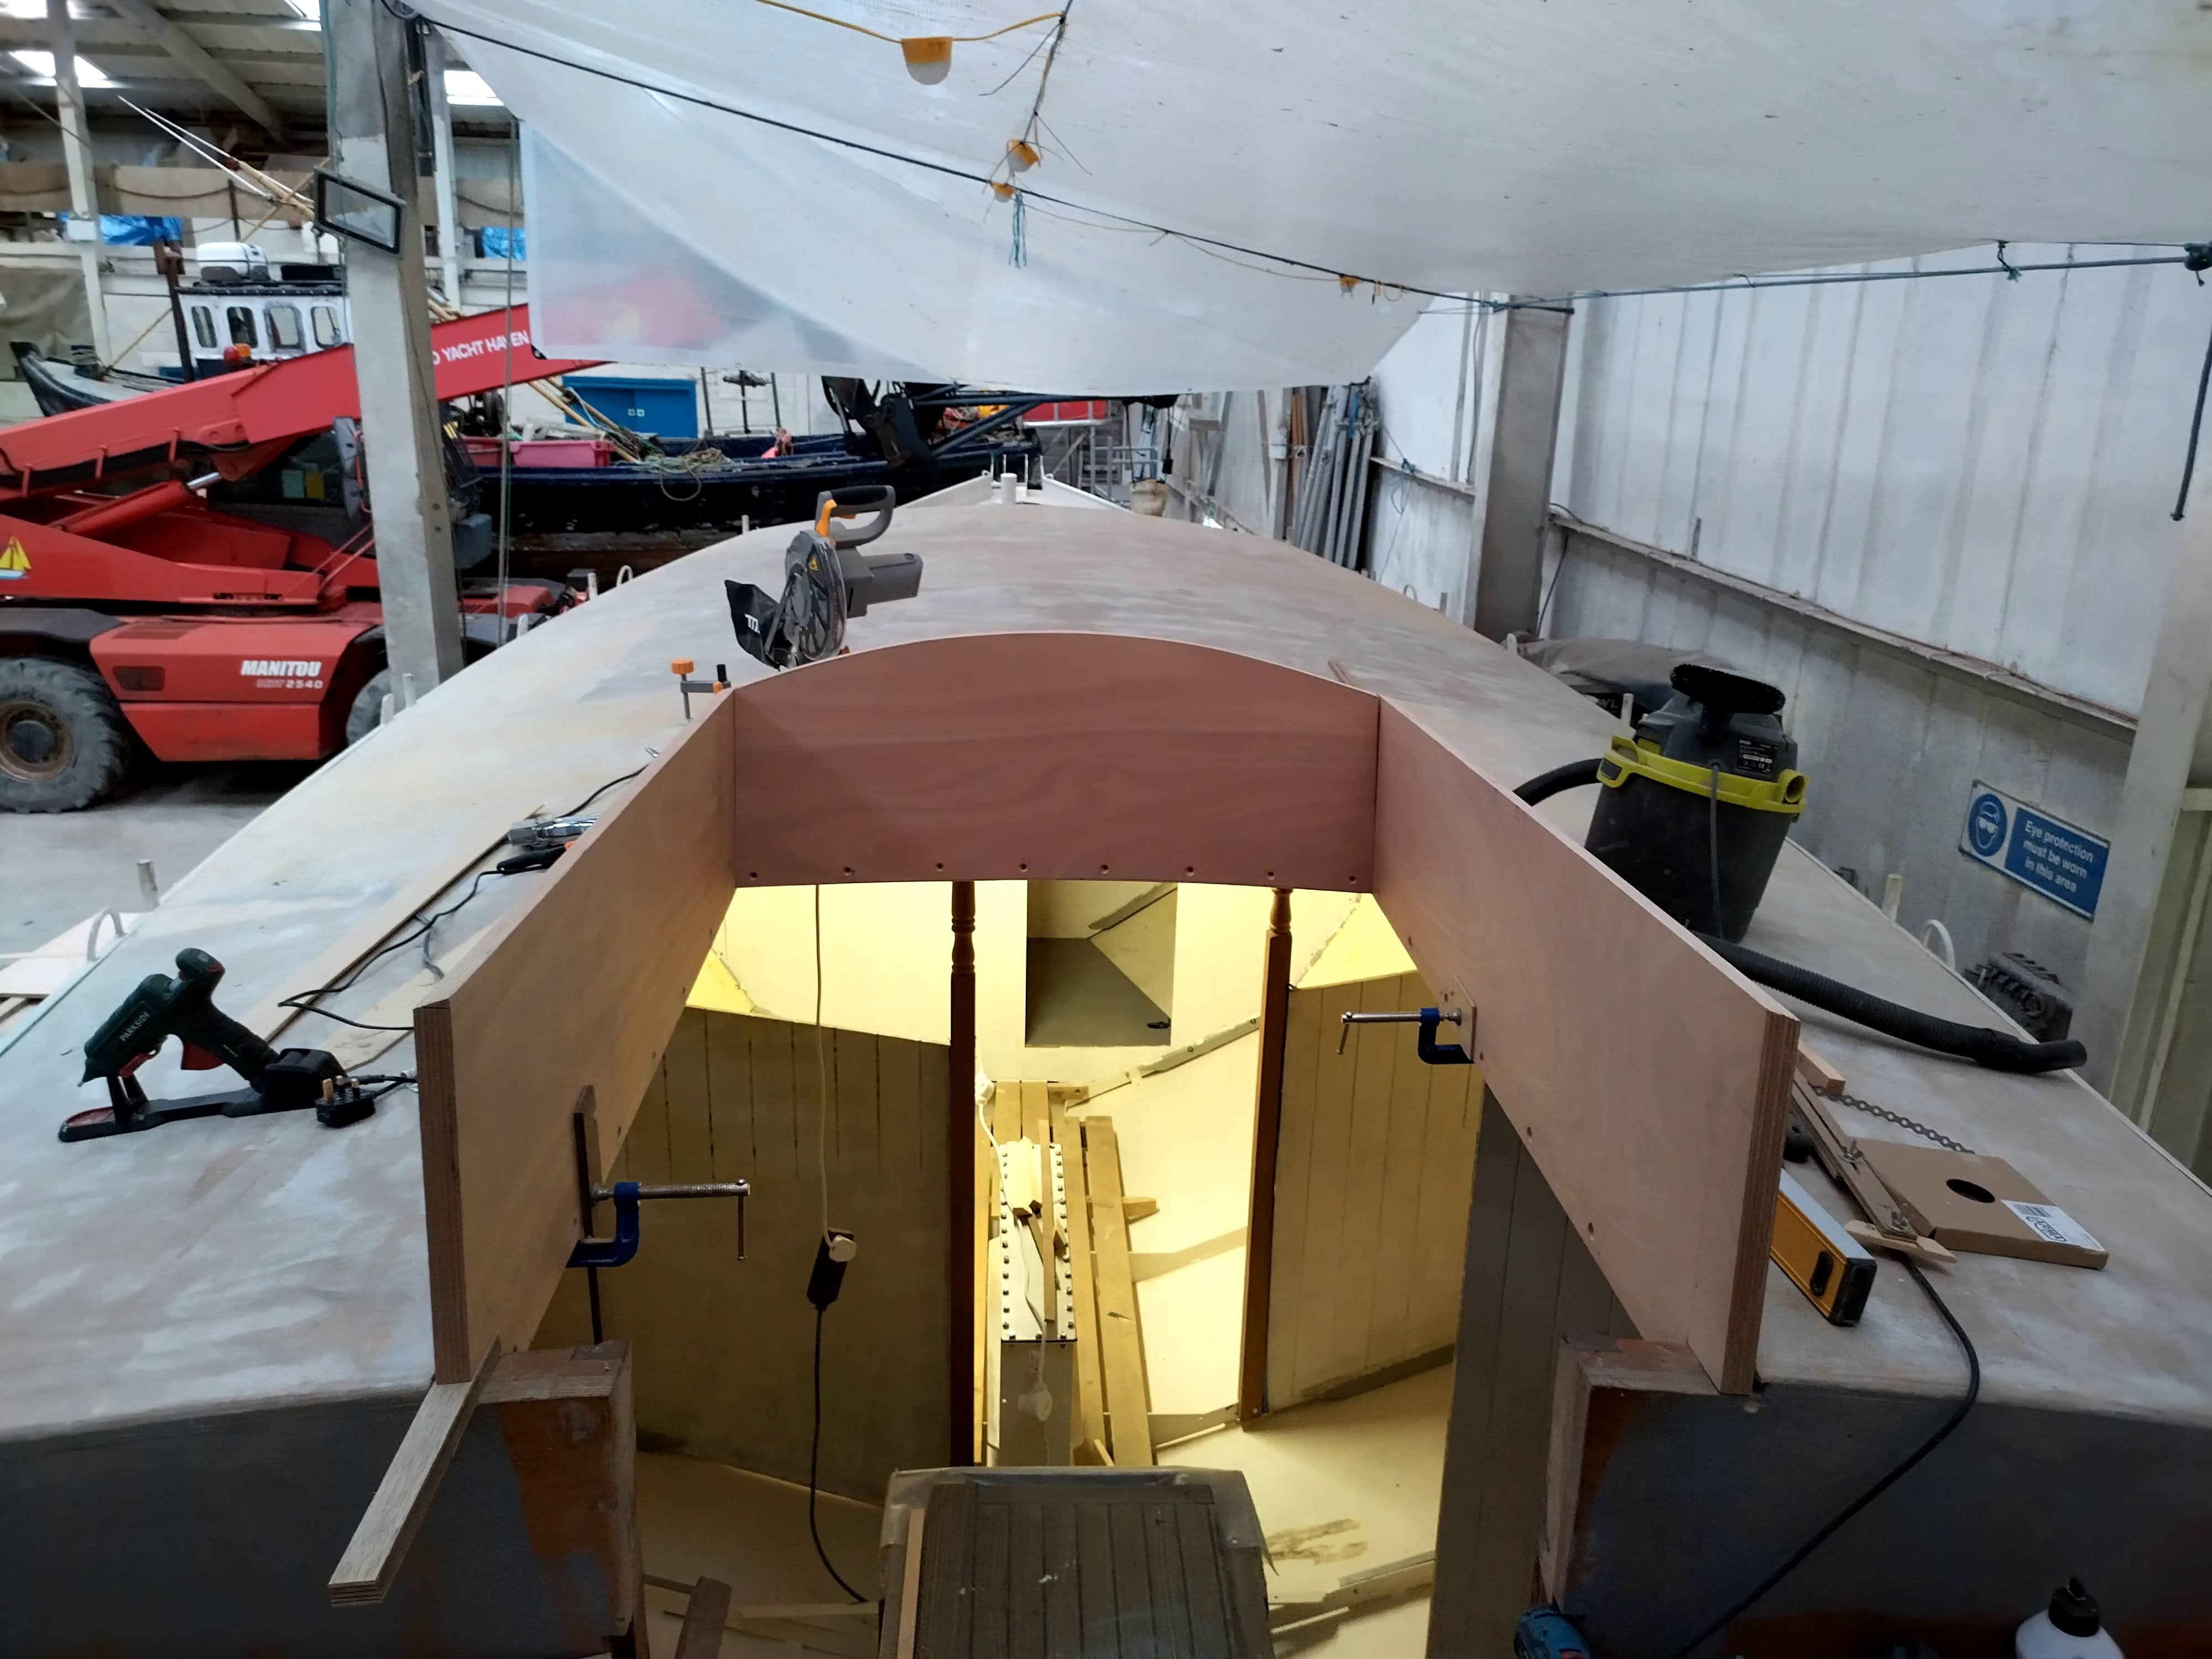
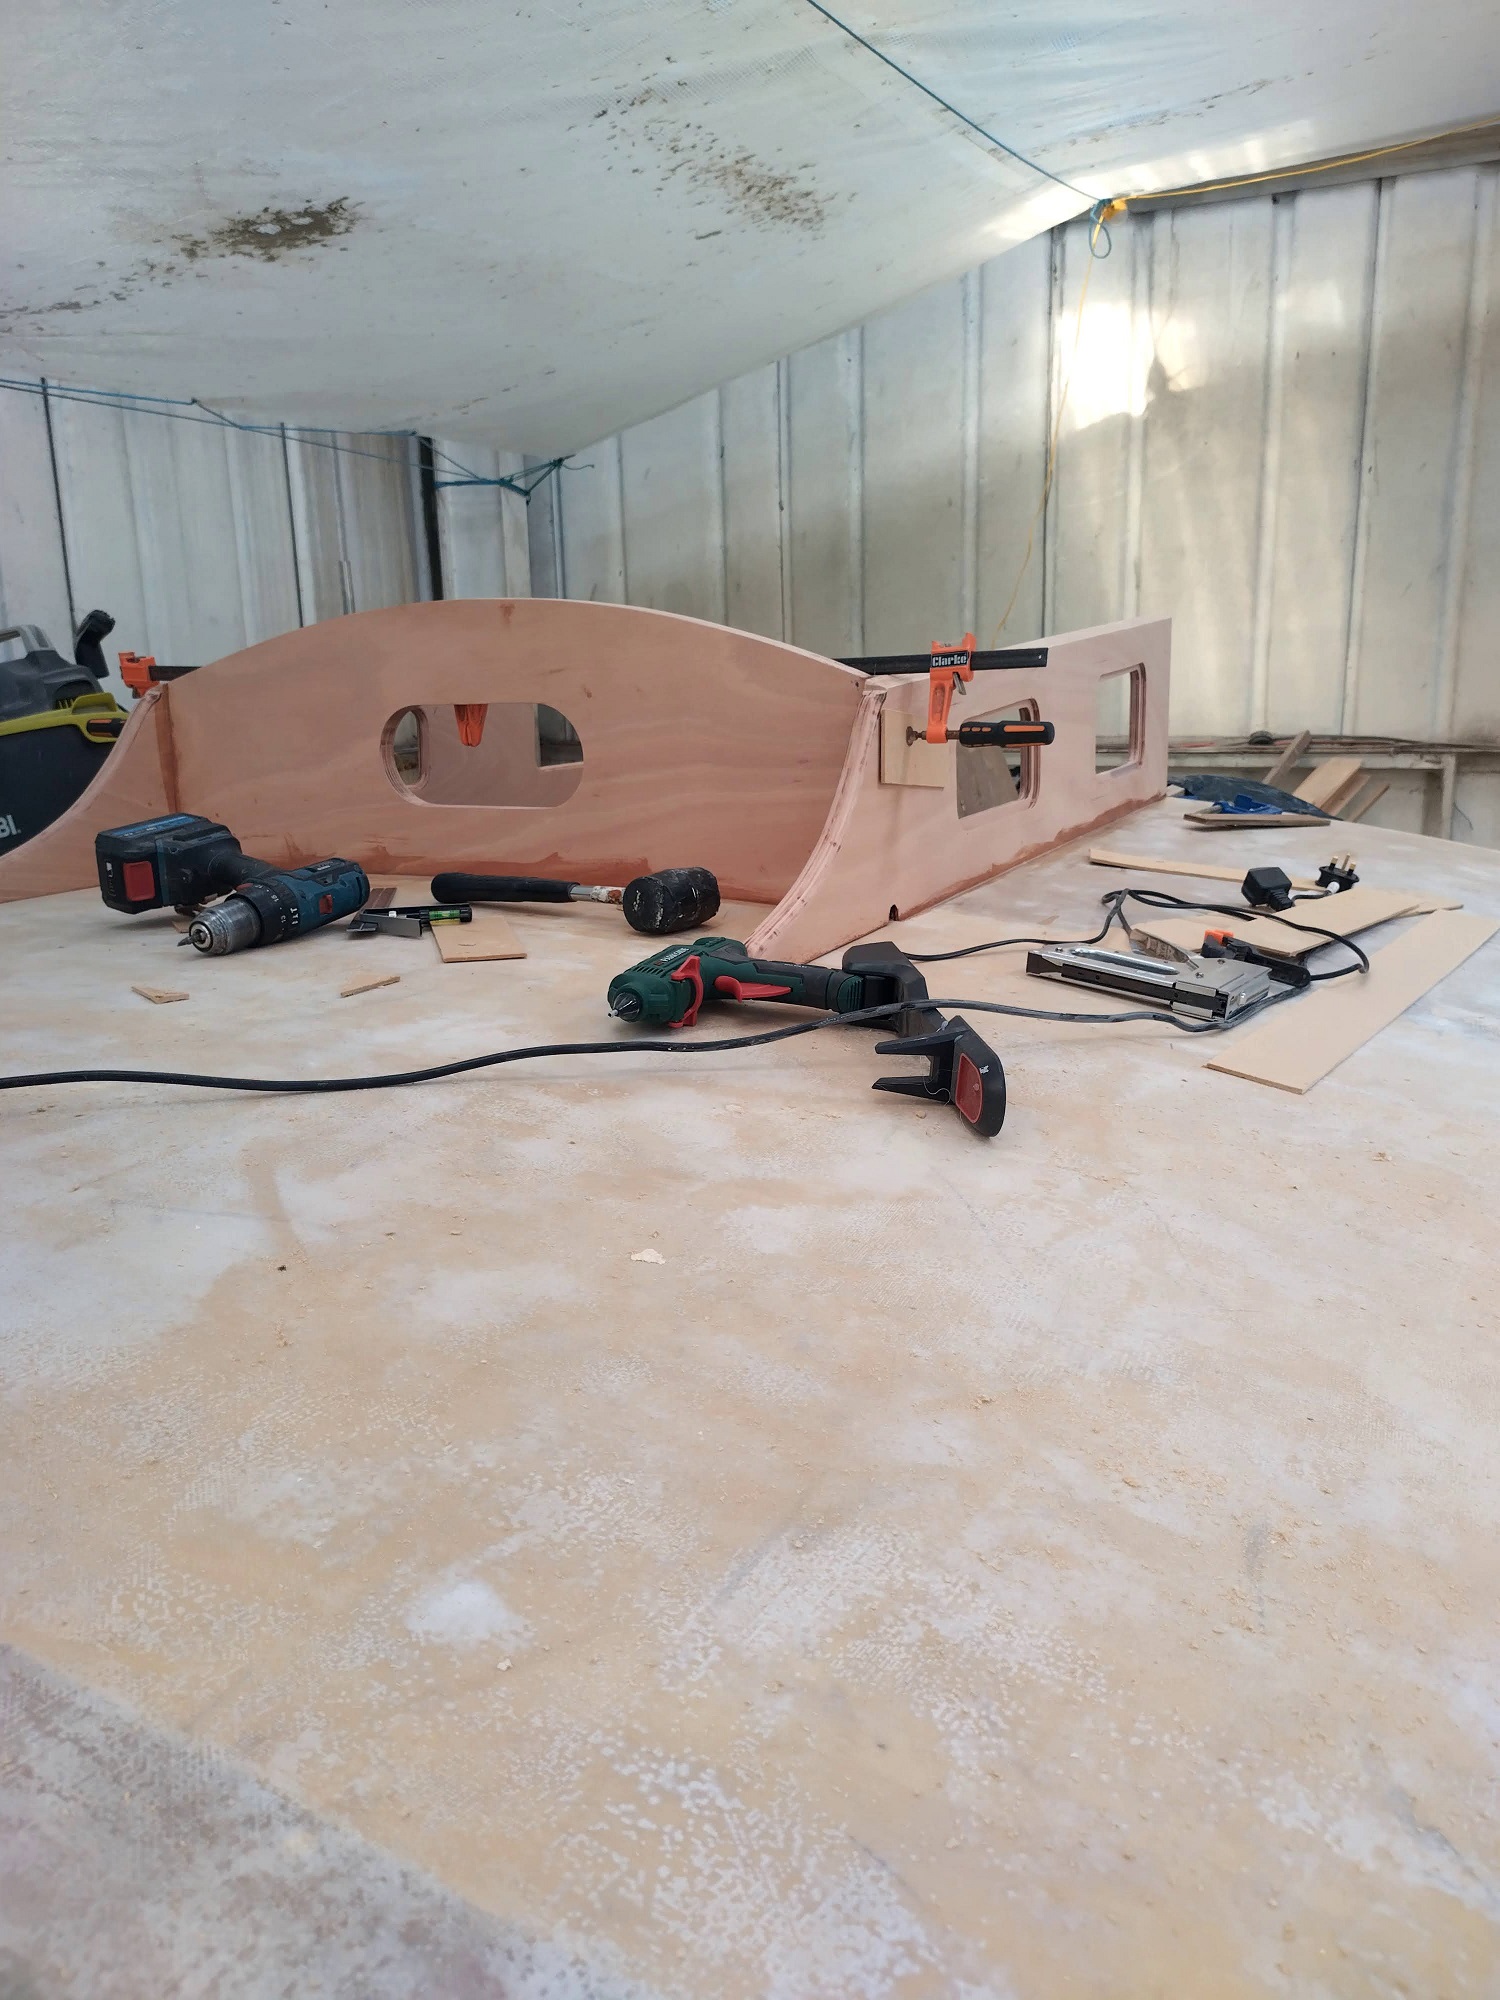
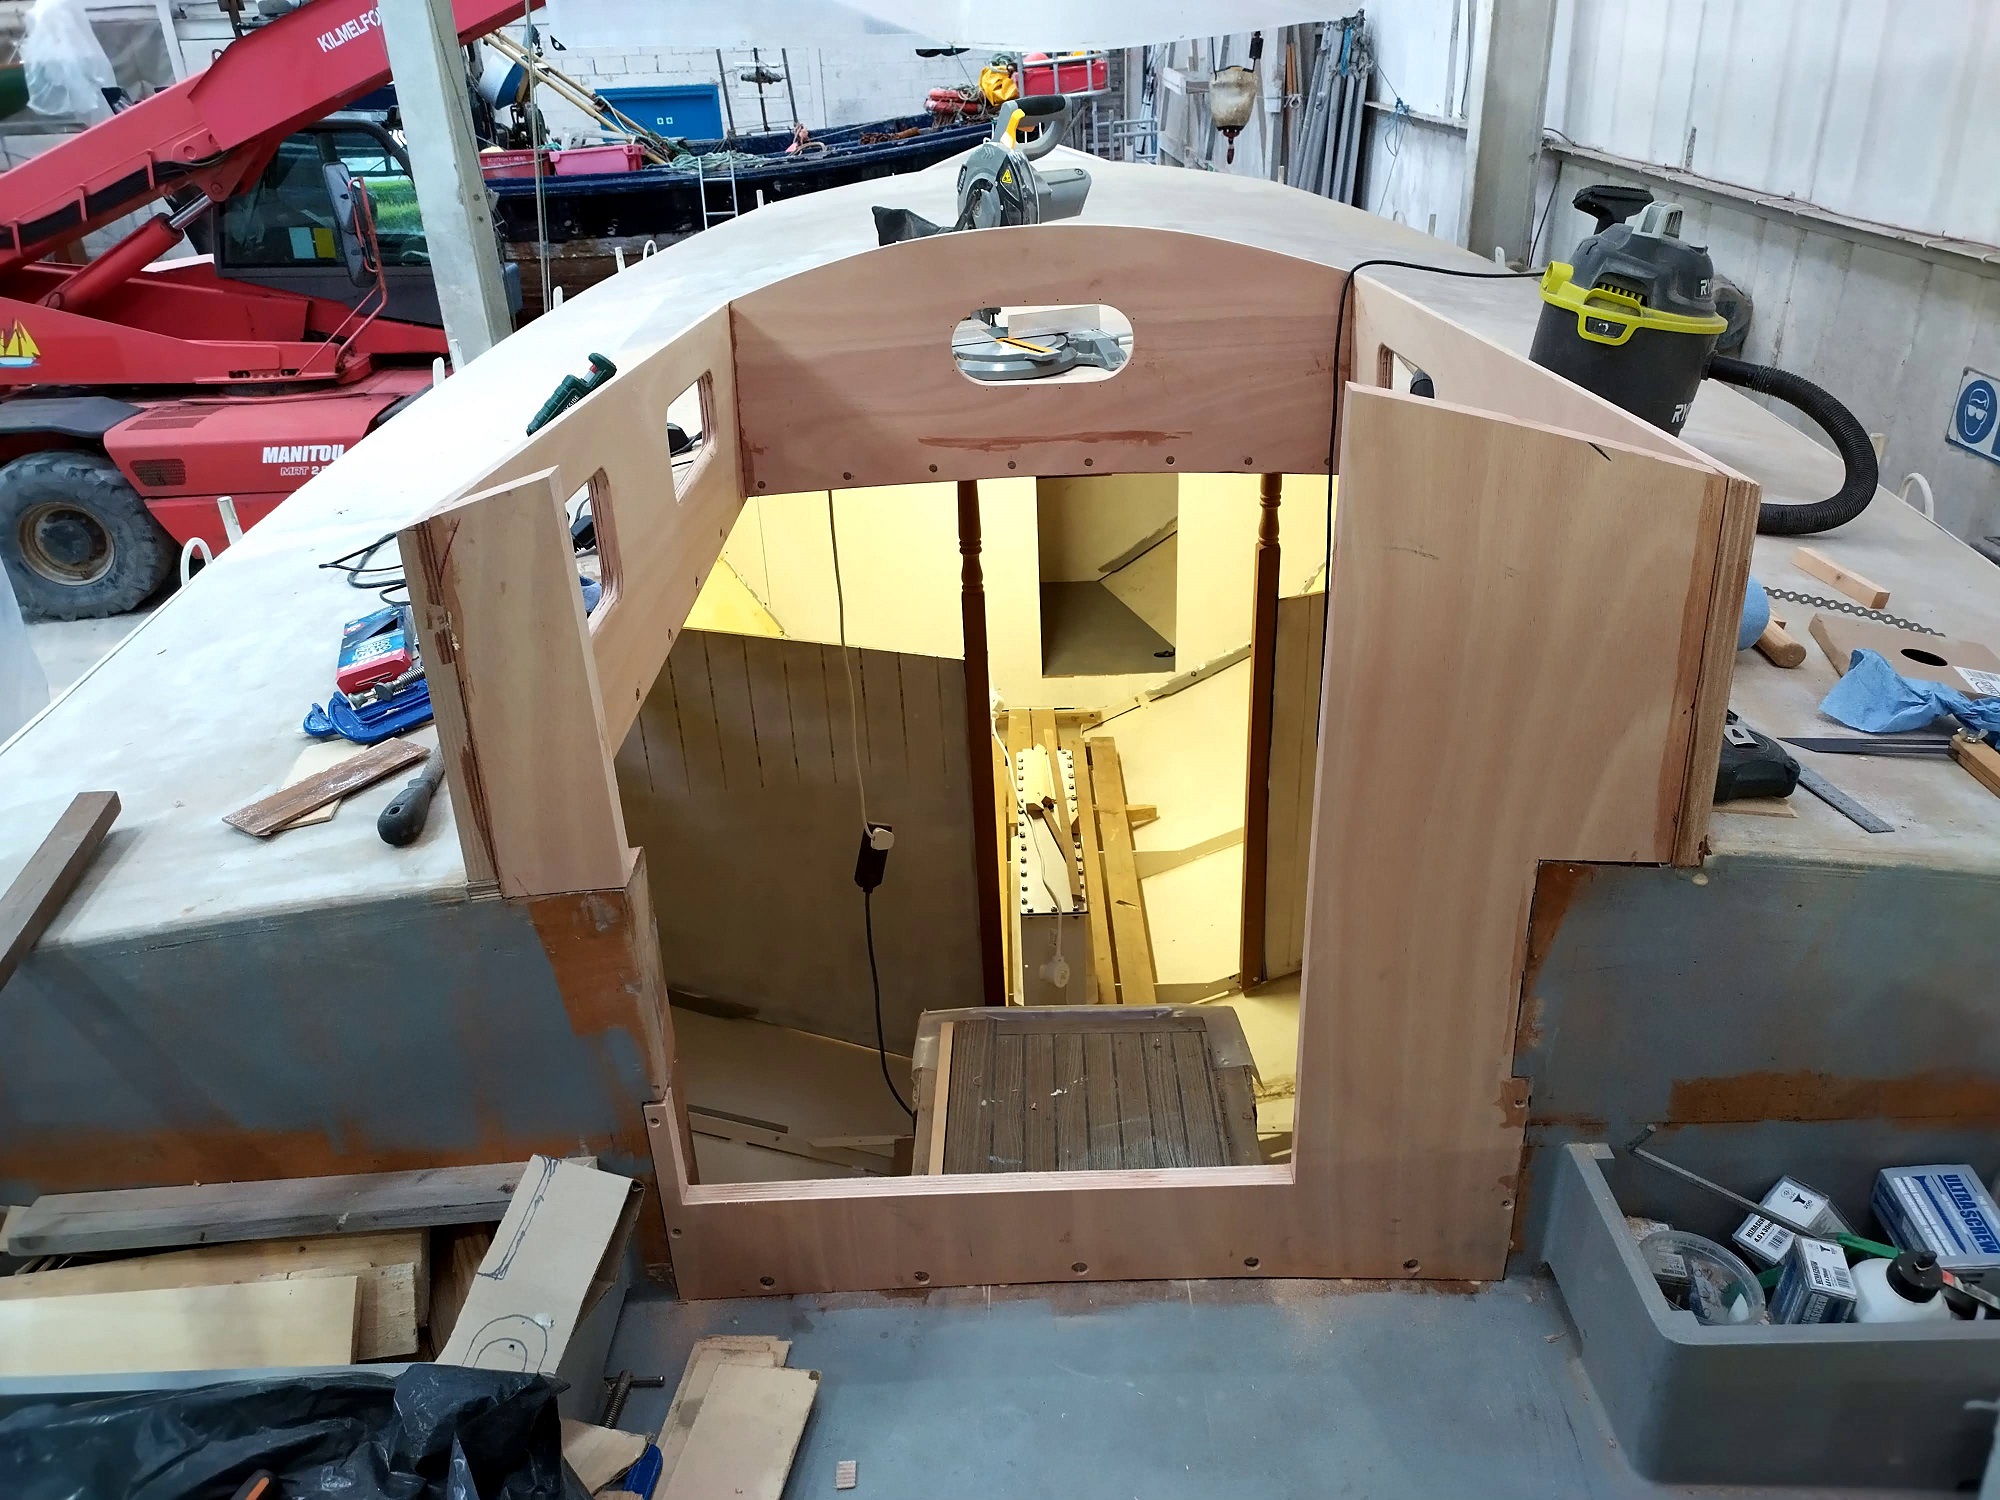
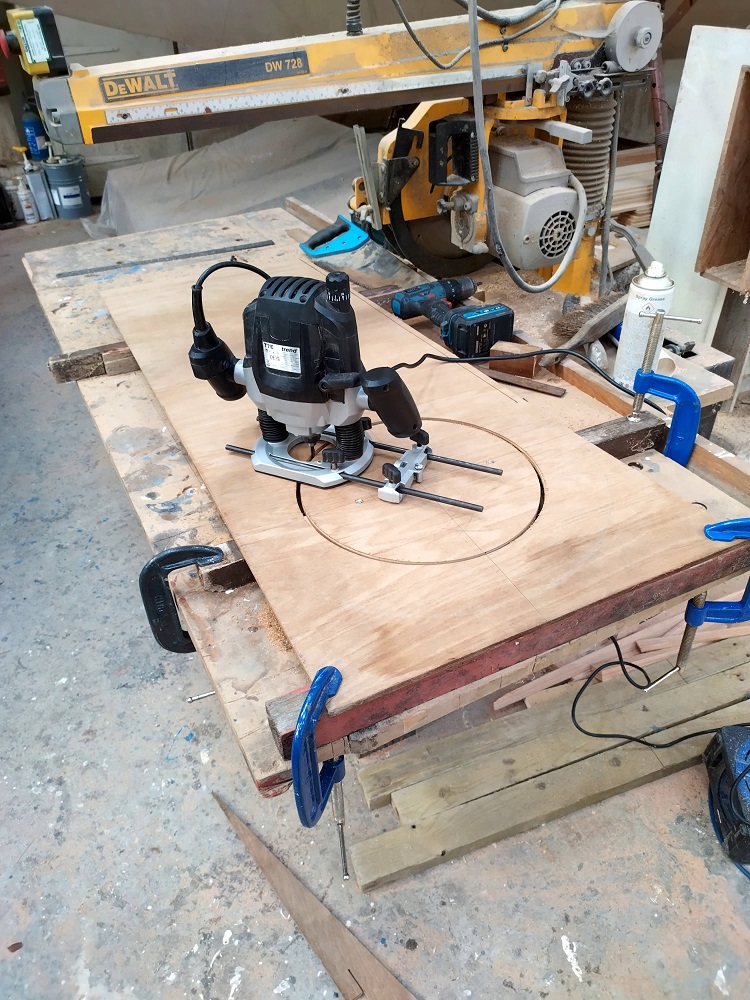
So far the whole doghouse was frameless (apart from the carlines around the opening), so the next part of the process was to fit corner posts in all four corners, as well as the “nailer” timber / roof beam shelf all around the top of the house, providing a good seat and some meaty hardwood into which the roof can later be screwed. This would also provide a seat for an intermediate deck beam at the halfway point along the length of the roof, providing some support for the laminated ply roof (which technically could be beamless, given its laminated structure), but more importantly some support for the carlines for the sliding companion hatch opening in the roof. The forward section of this shelf of course had to follow the curve of the roof camber, which is too acute for one single piece to be bent into, so would involve laminating. As I needed to laminate a deck beam to the same curve, I chose some thin planks of sapele which I had in stock, which would be wide enough to rip into the two required members once laminated. I planed the planks to a uniform thickness so that they would make up the required depth of beam once laminated, and set up a series of blocks following the required curve (about 1″ depth for every foot of length) on the bench (which I first covered with plastic sheet to protect against oozing epoxy), buttered the slices with thickened epoxy, clamped the whole lot to the centre block and bent them round the curve, clamping as I went. This required all my clamps and some of the yard’s to achieve, as I’d chosen only to clamp the jig blocks to the bench rather than secure them with screws / bolts.
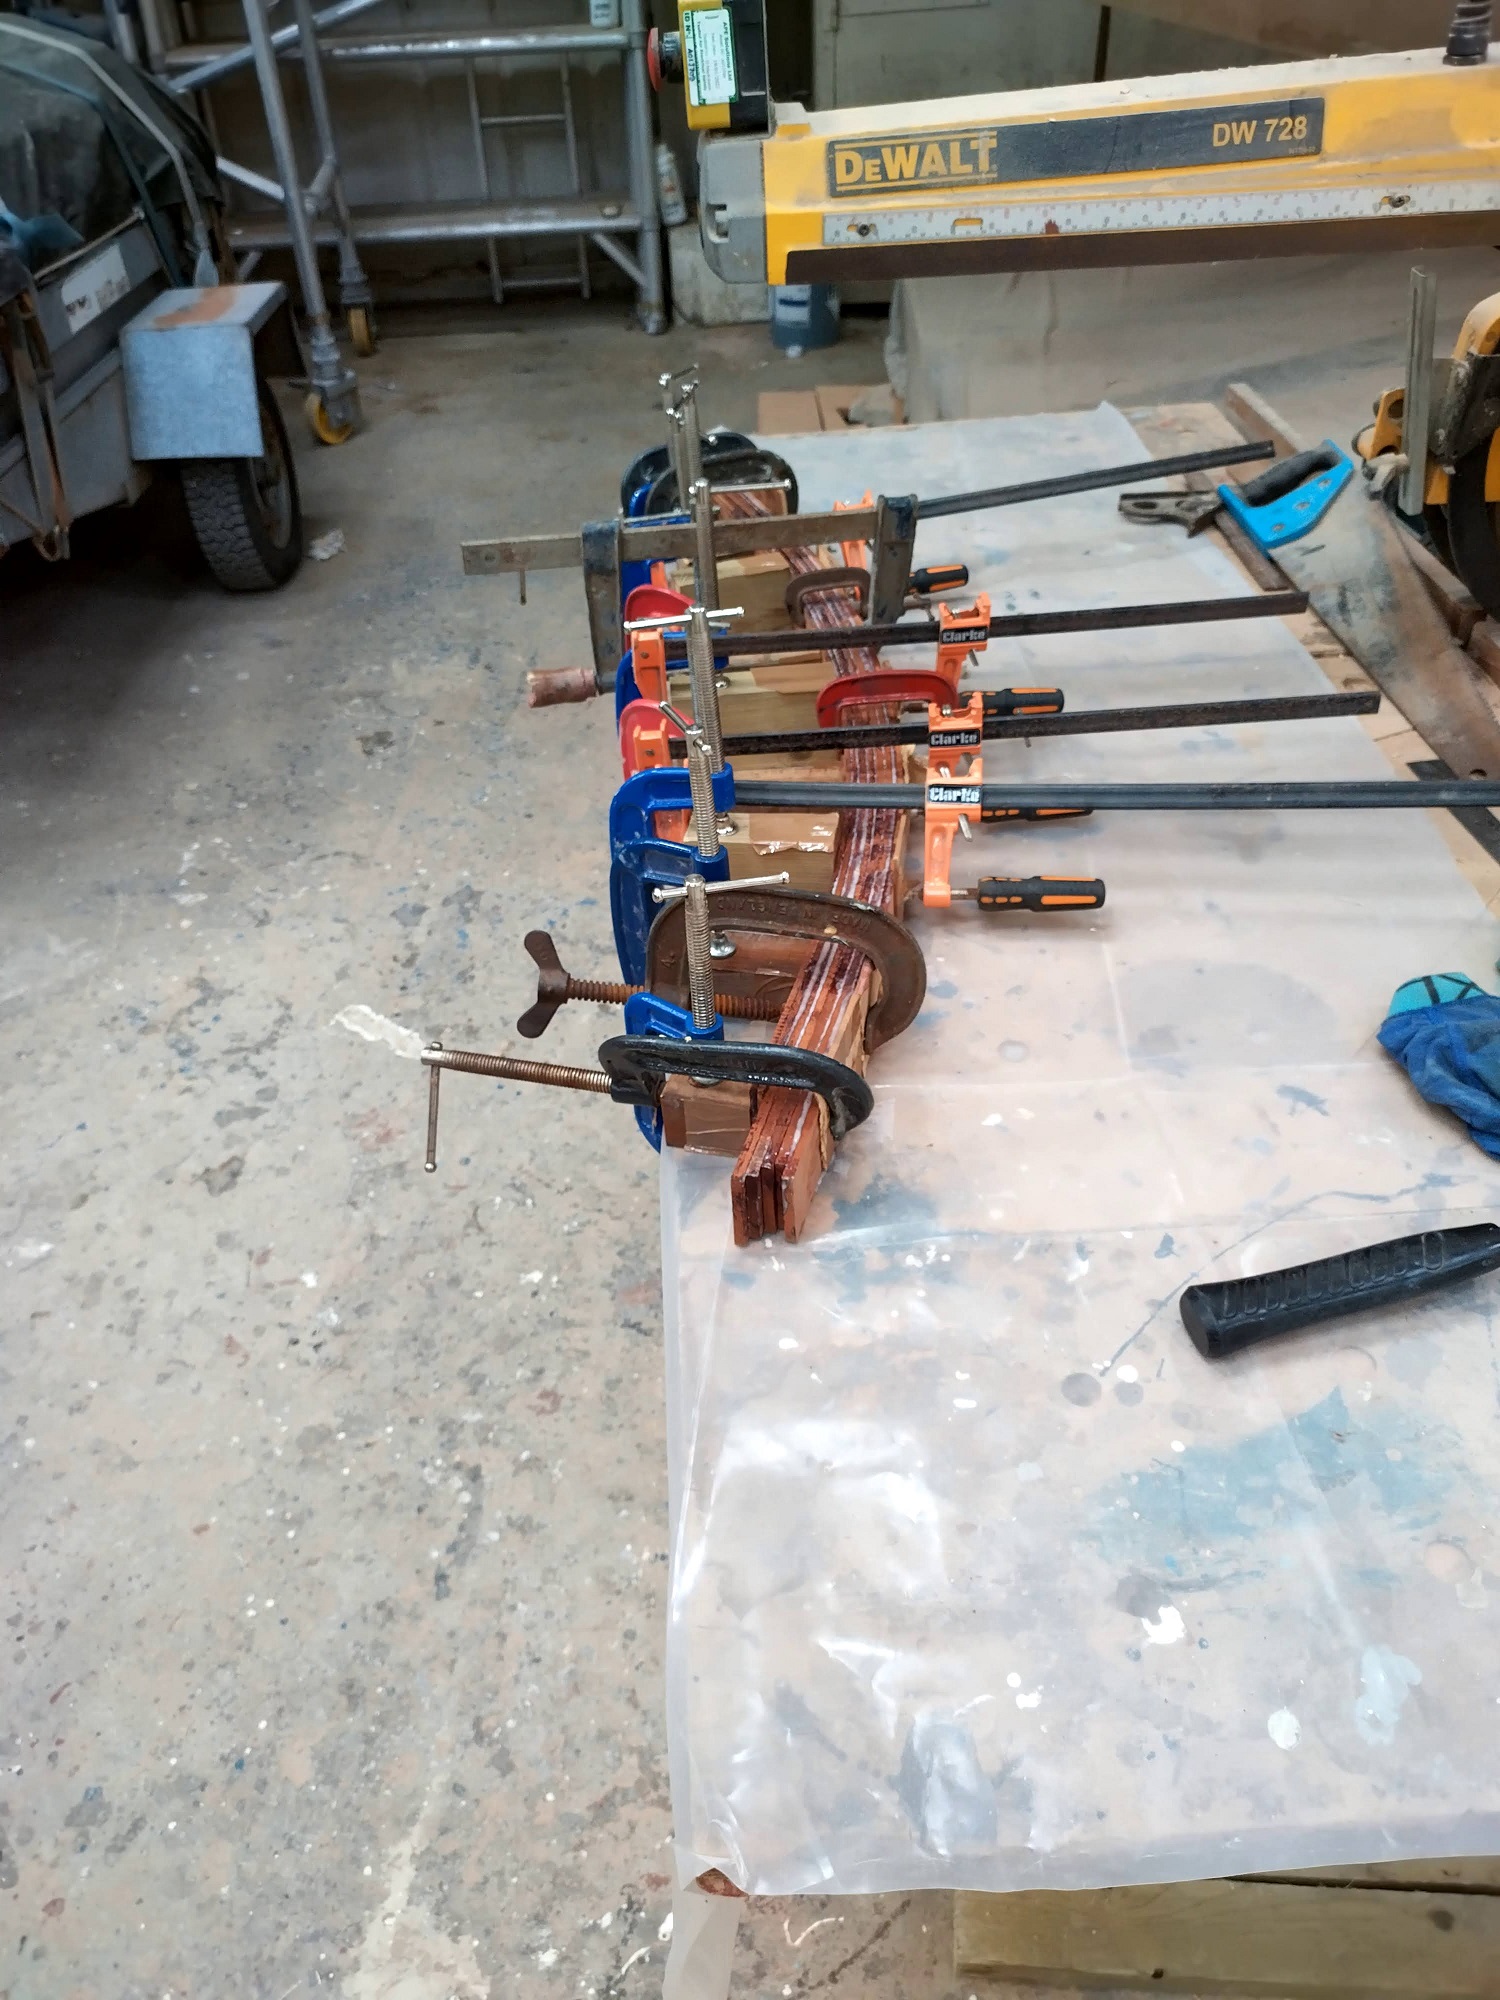
Once the epoxy had cured I was able to free the beam from the jig, and to my delight it only sprung back a tiny amount when I did so, so remained pretty faithful to the curve. I later discovered that the curve itself was slightly irregular, as I took it off the template I had made ages ago, rather than double checking by redrawing the curve from first principles and forming the jig to that. This would cause some minor headaches in due course, but fortunately nothing irretrievable.
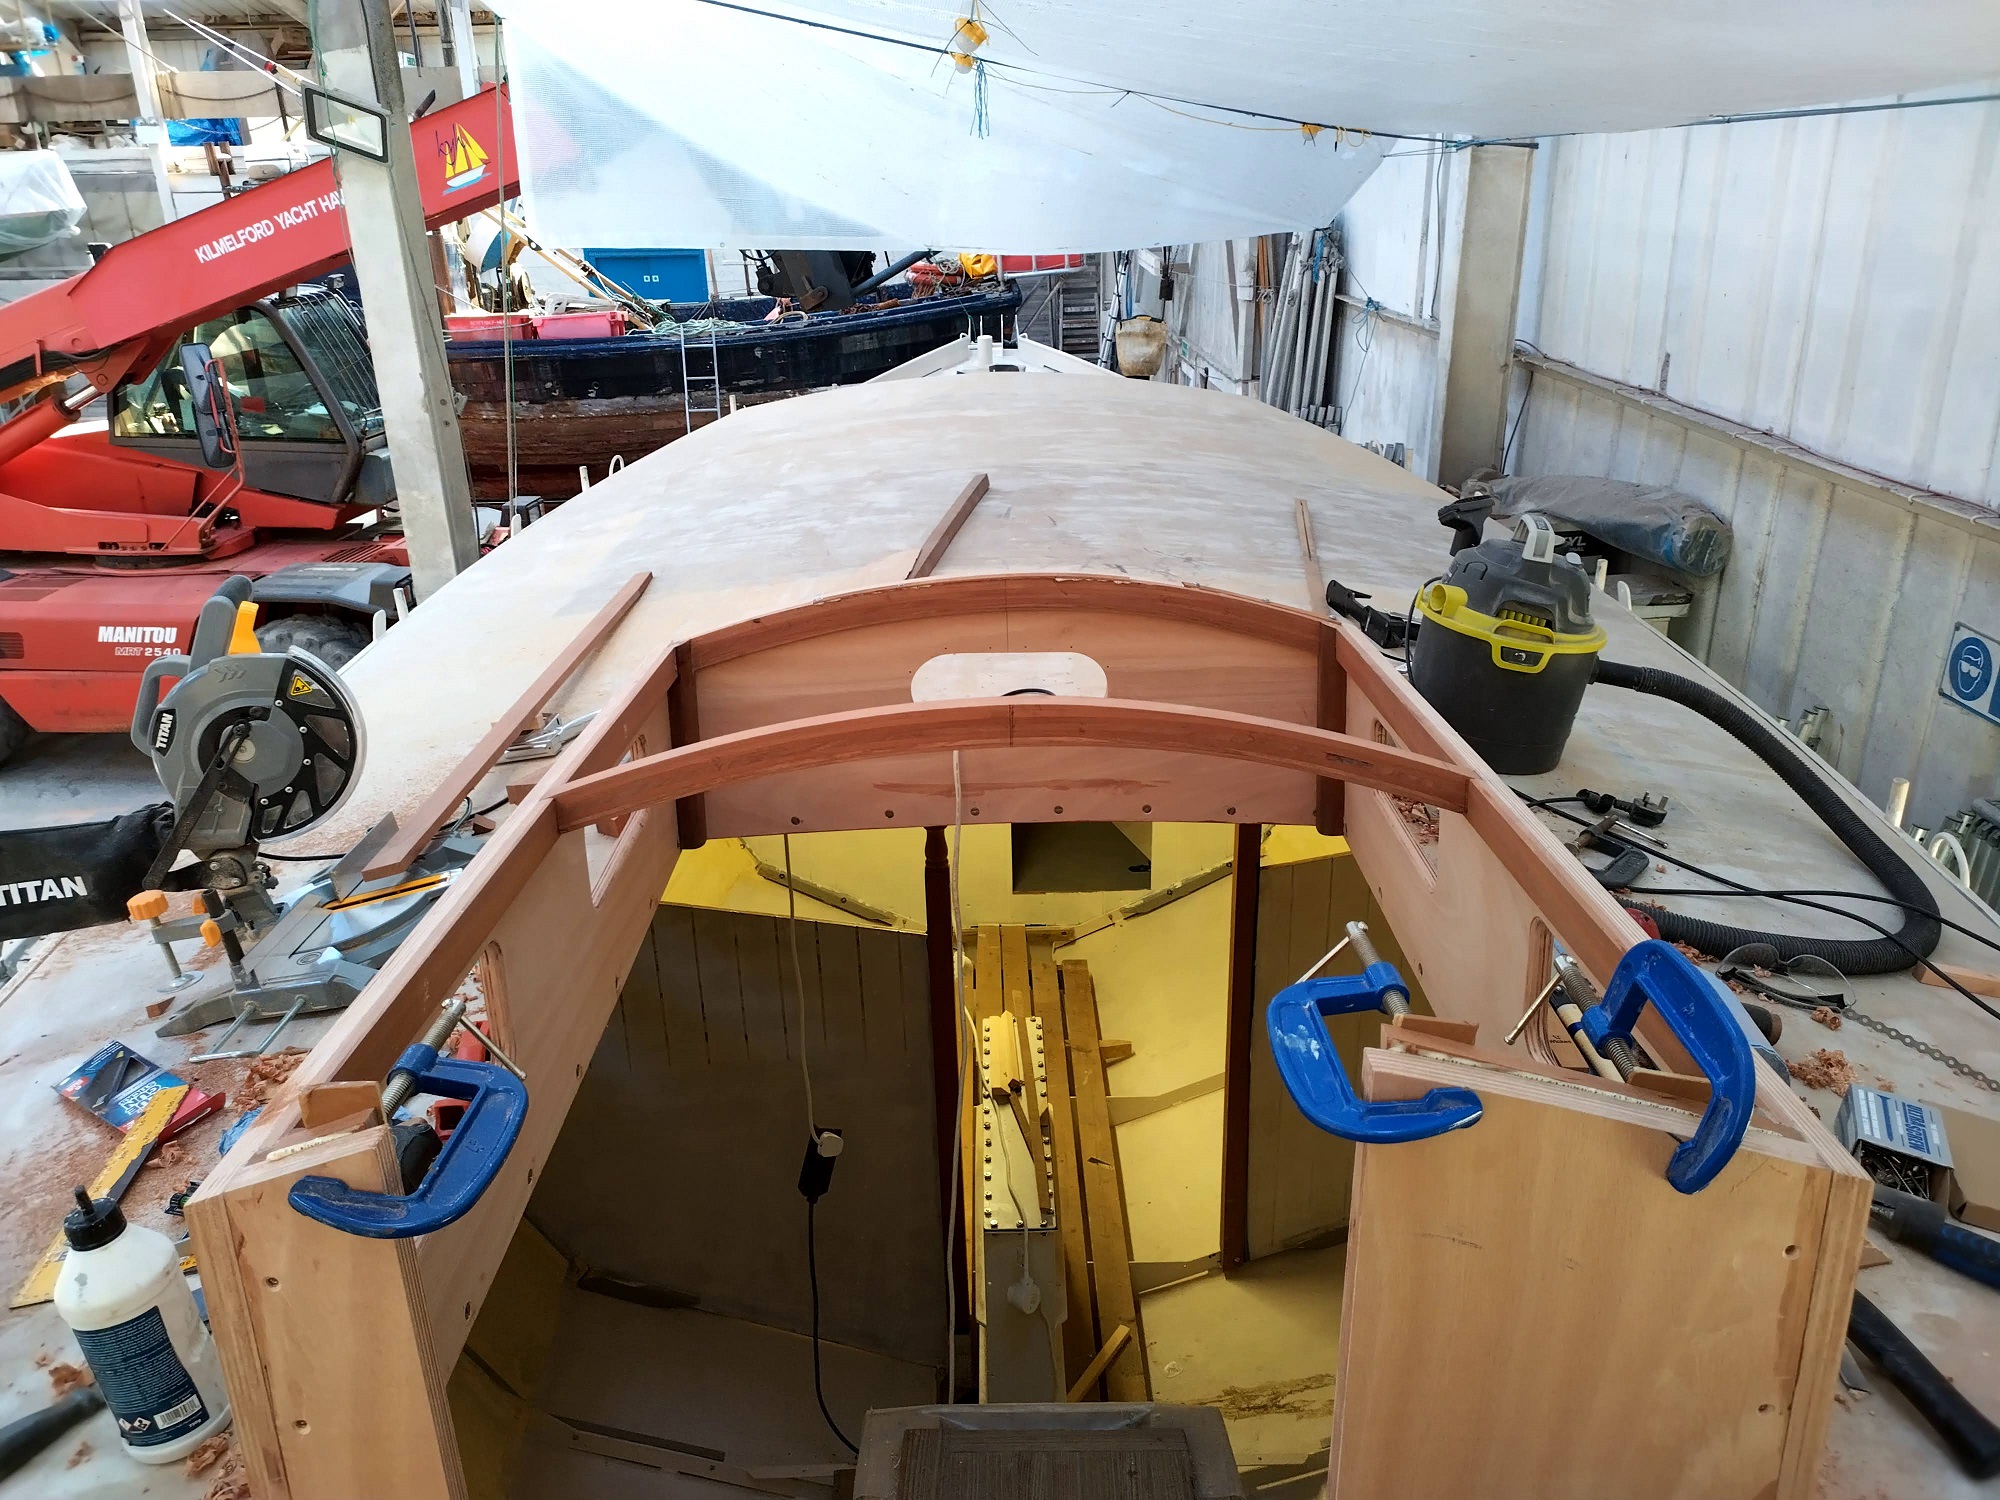
In the meantime, I used my planer / thicknesser to clean up and plane smooth the beam’s side faces so I then had a regular shaped piece to run through the table saw to cut to two lengths: one of 15mm thick to form the forward nailer / shelf beam, and one of 25mm thick for the deck beam. These were passed through the thicknesser a final time after ripping to smooth the sawn faces, and then cut to length to fit the house.
Whilst the beam had been gluing, I cut the four corner posts and the side nailers / shelves, notching the tops of the corner posts ready to accept the nailers. I then glued and screwed the corner posts in place, followed by the side nailers and the forward, laminated one. As I was gluing this (keen to make progress, I had not noticed anything unduly wrong during dry-fitting), I noticed that the curve of the fwd nailer did not exactly match that of the top of the plywood face. This caused me a slightly sleep-deprived night as I contemplated the prospect of having to cut the already-glued piece out again, and having to laminate a new beam and do it all again. However, in the cold light of day I decided the first thing to do was to draw the actual curve on the plywood face, as it was likely that both were irregular due to my having used my old, battered cardboard template as a pattern for both. This exercise revealed exactly that, and that where the nailer was out of true on one side, the plywood edge was pretty matched on the other side. This meant that I could use some hardwood shims on both sides to bring the curve up to a symmetrical shape to match the drawn curve. I quickly knocked up some shims and glued them to the top edges where they were irregular, and later planed and sanded them to a regular shape. Meanwhile I cut a new plywood template of the true curve, which I then screwed to the side of the deck beam and used my router to trim the top of the beam to the right shape. The template will be reused at a later date when it comes to laminating the roof, as it will need a number of temporary formers in place during laminating to ensure the curve of the lid is consistent over its entire length – for which the existing framework of the doghouse alone will not be sufficient.
Once this issue was resolved, I was able to finish the framework by notching the side nailers for the intermediate beam, adding side frames to the companionway opening, and nailers each side for the roof, and finally two longitudinal carlines to form the hatch sides in the roof. These and the intermediate beam will not be glued until much later, as I need for now to keep the doghouse top open so I can still get larger items in to the boat as I continue fitting out the interior. Lastly, before moving on to other things, I used epoxy filler to fillet all around the joins where the doghouse joins the deck or the aft cabin face, fill screwholes and reinforce the joints between old and new framework. The whole structure will now need several coats of raw epoxy resin to waterproof it, and in due course a two-pack paint system and the window glasses to be fitted (as well as the roof, of course!).
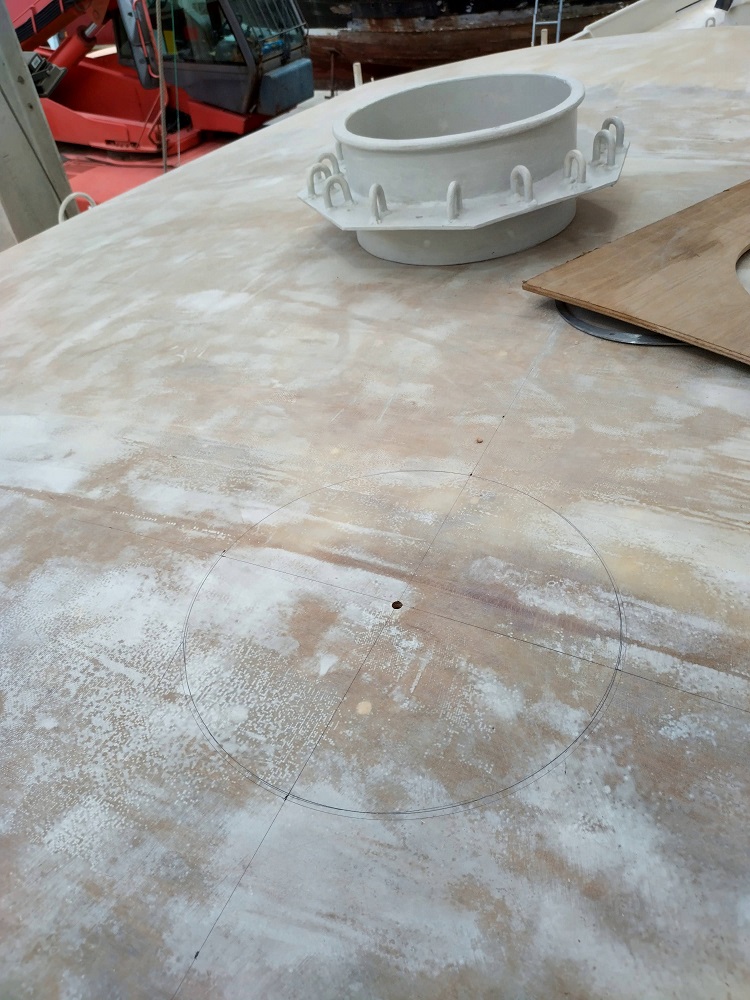
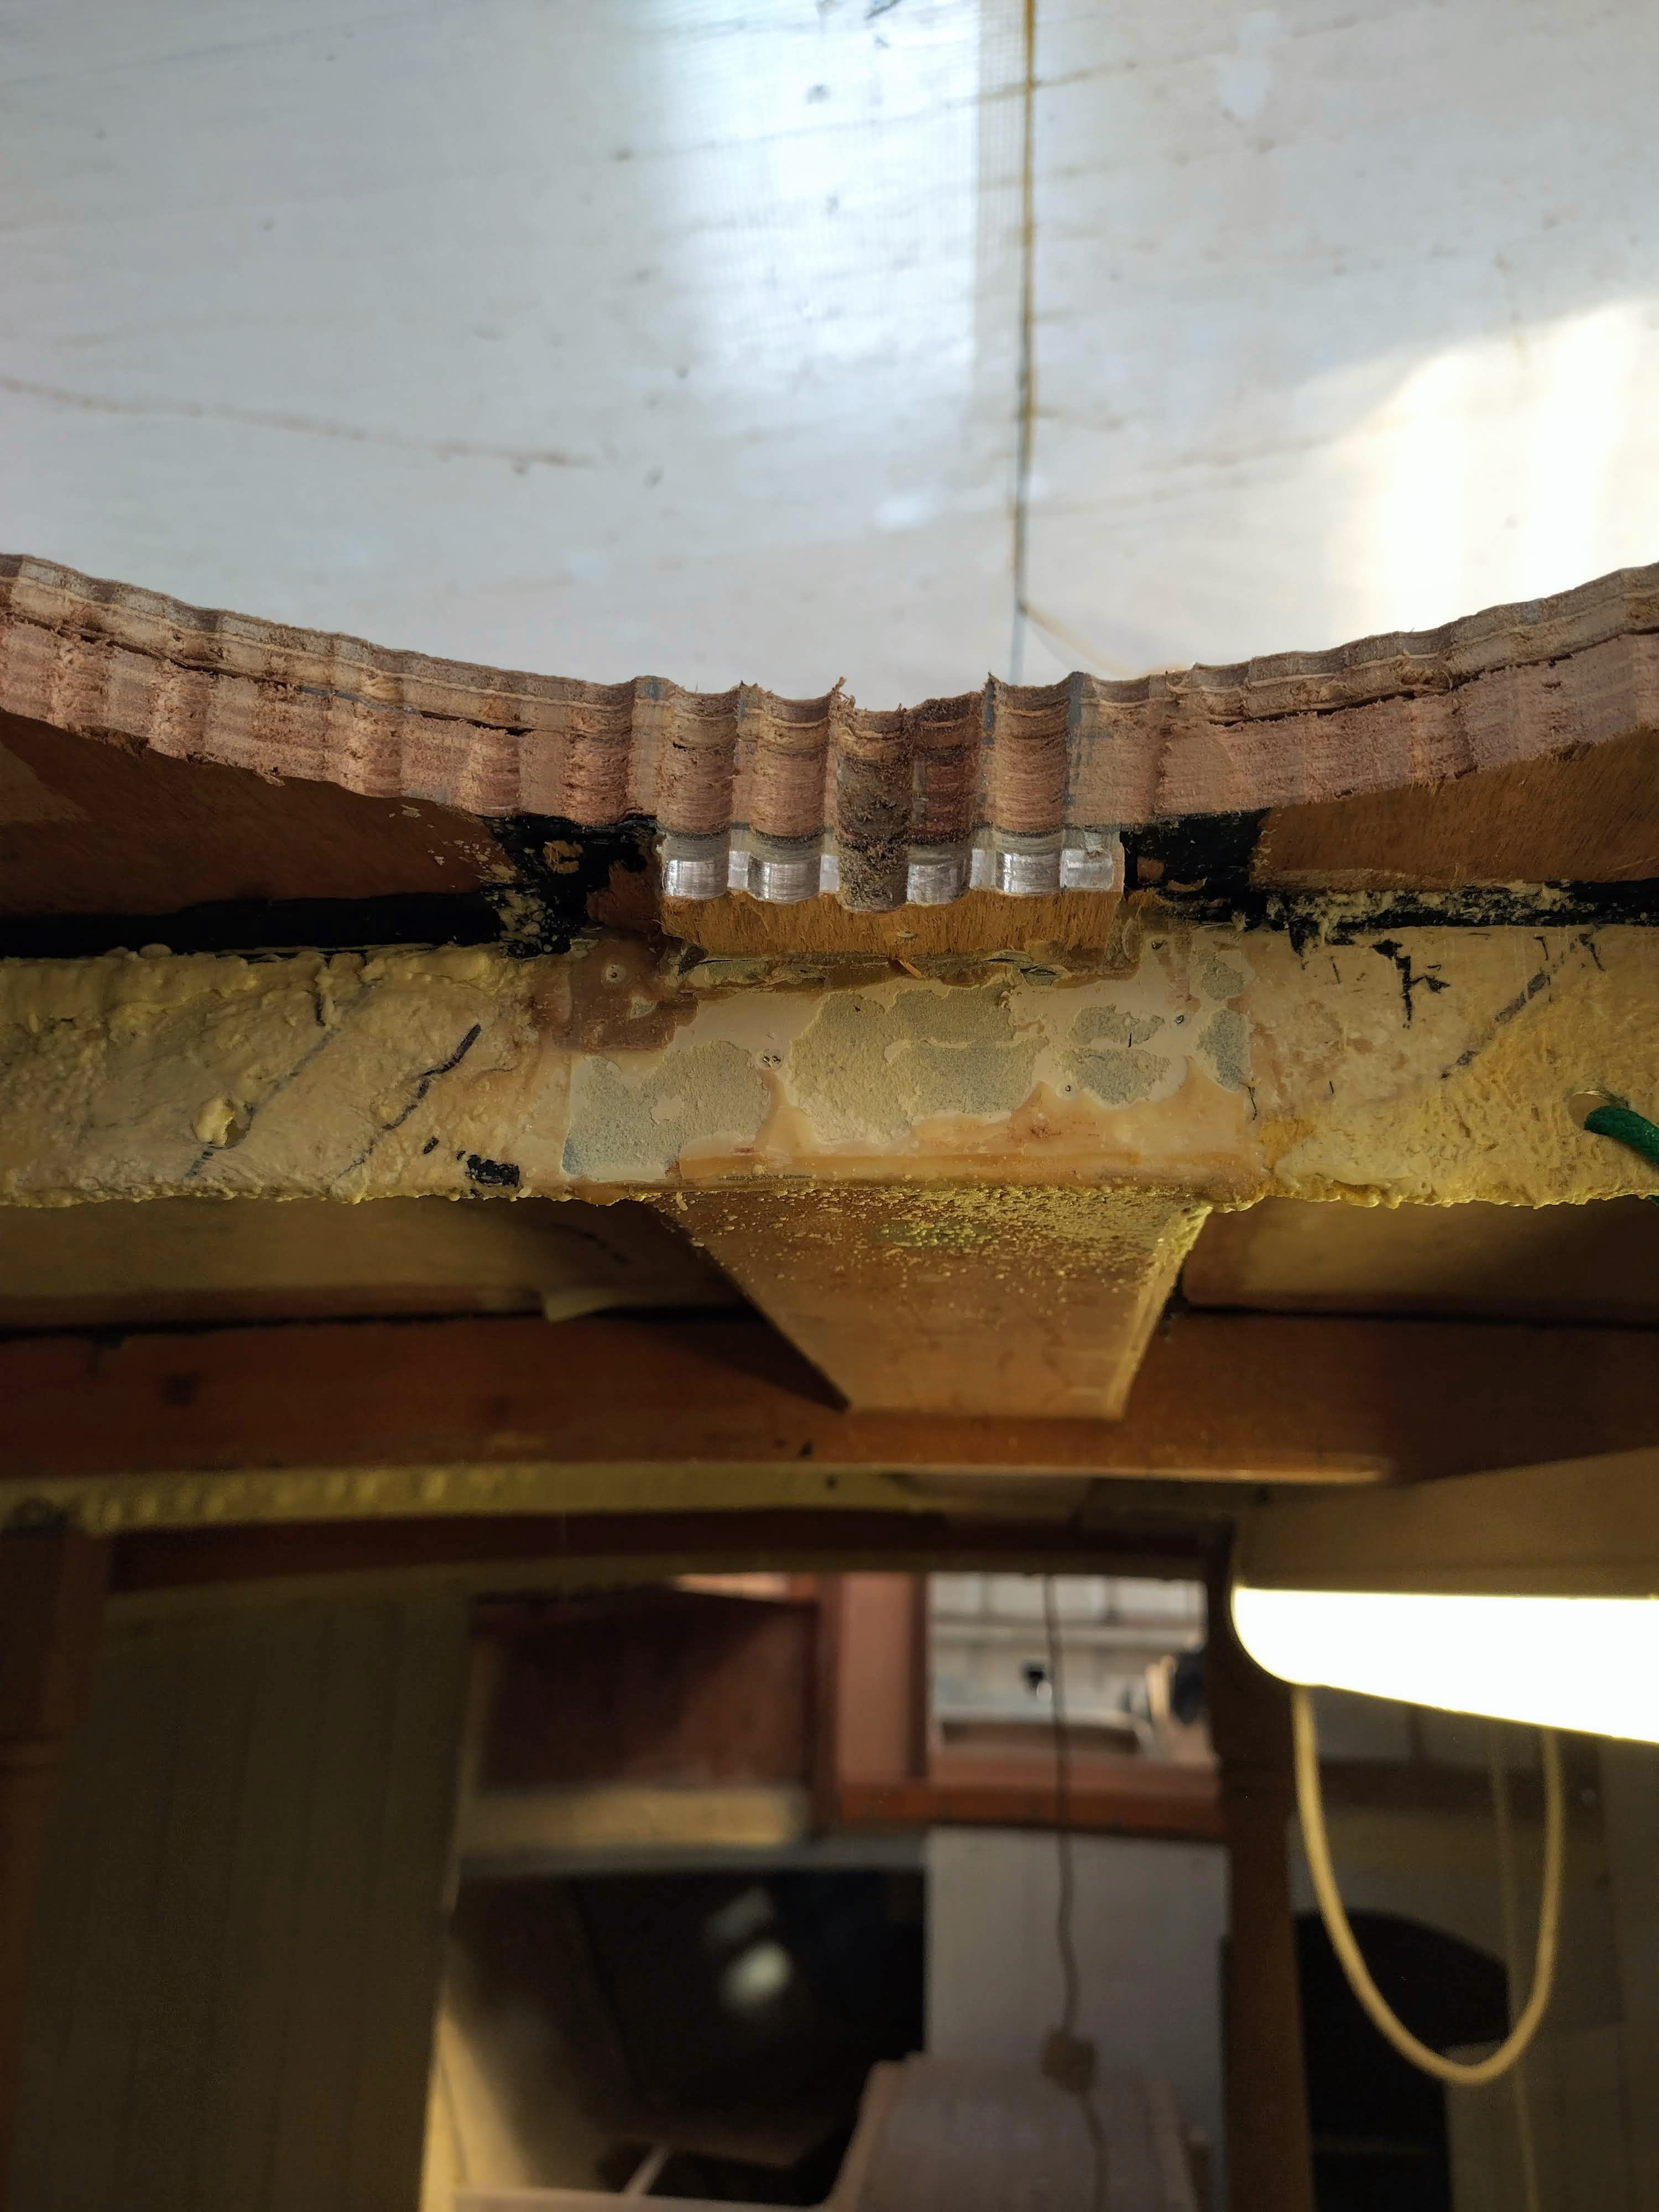
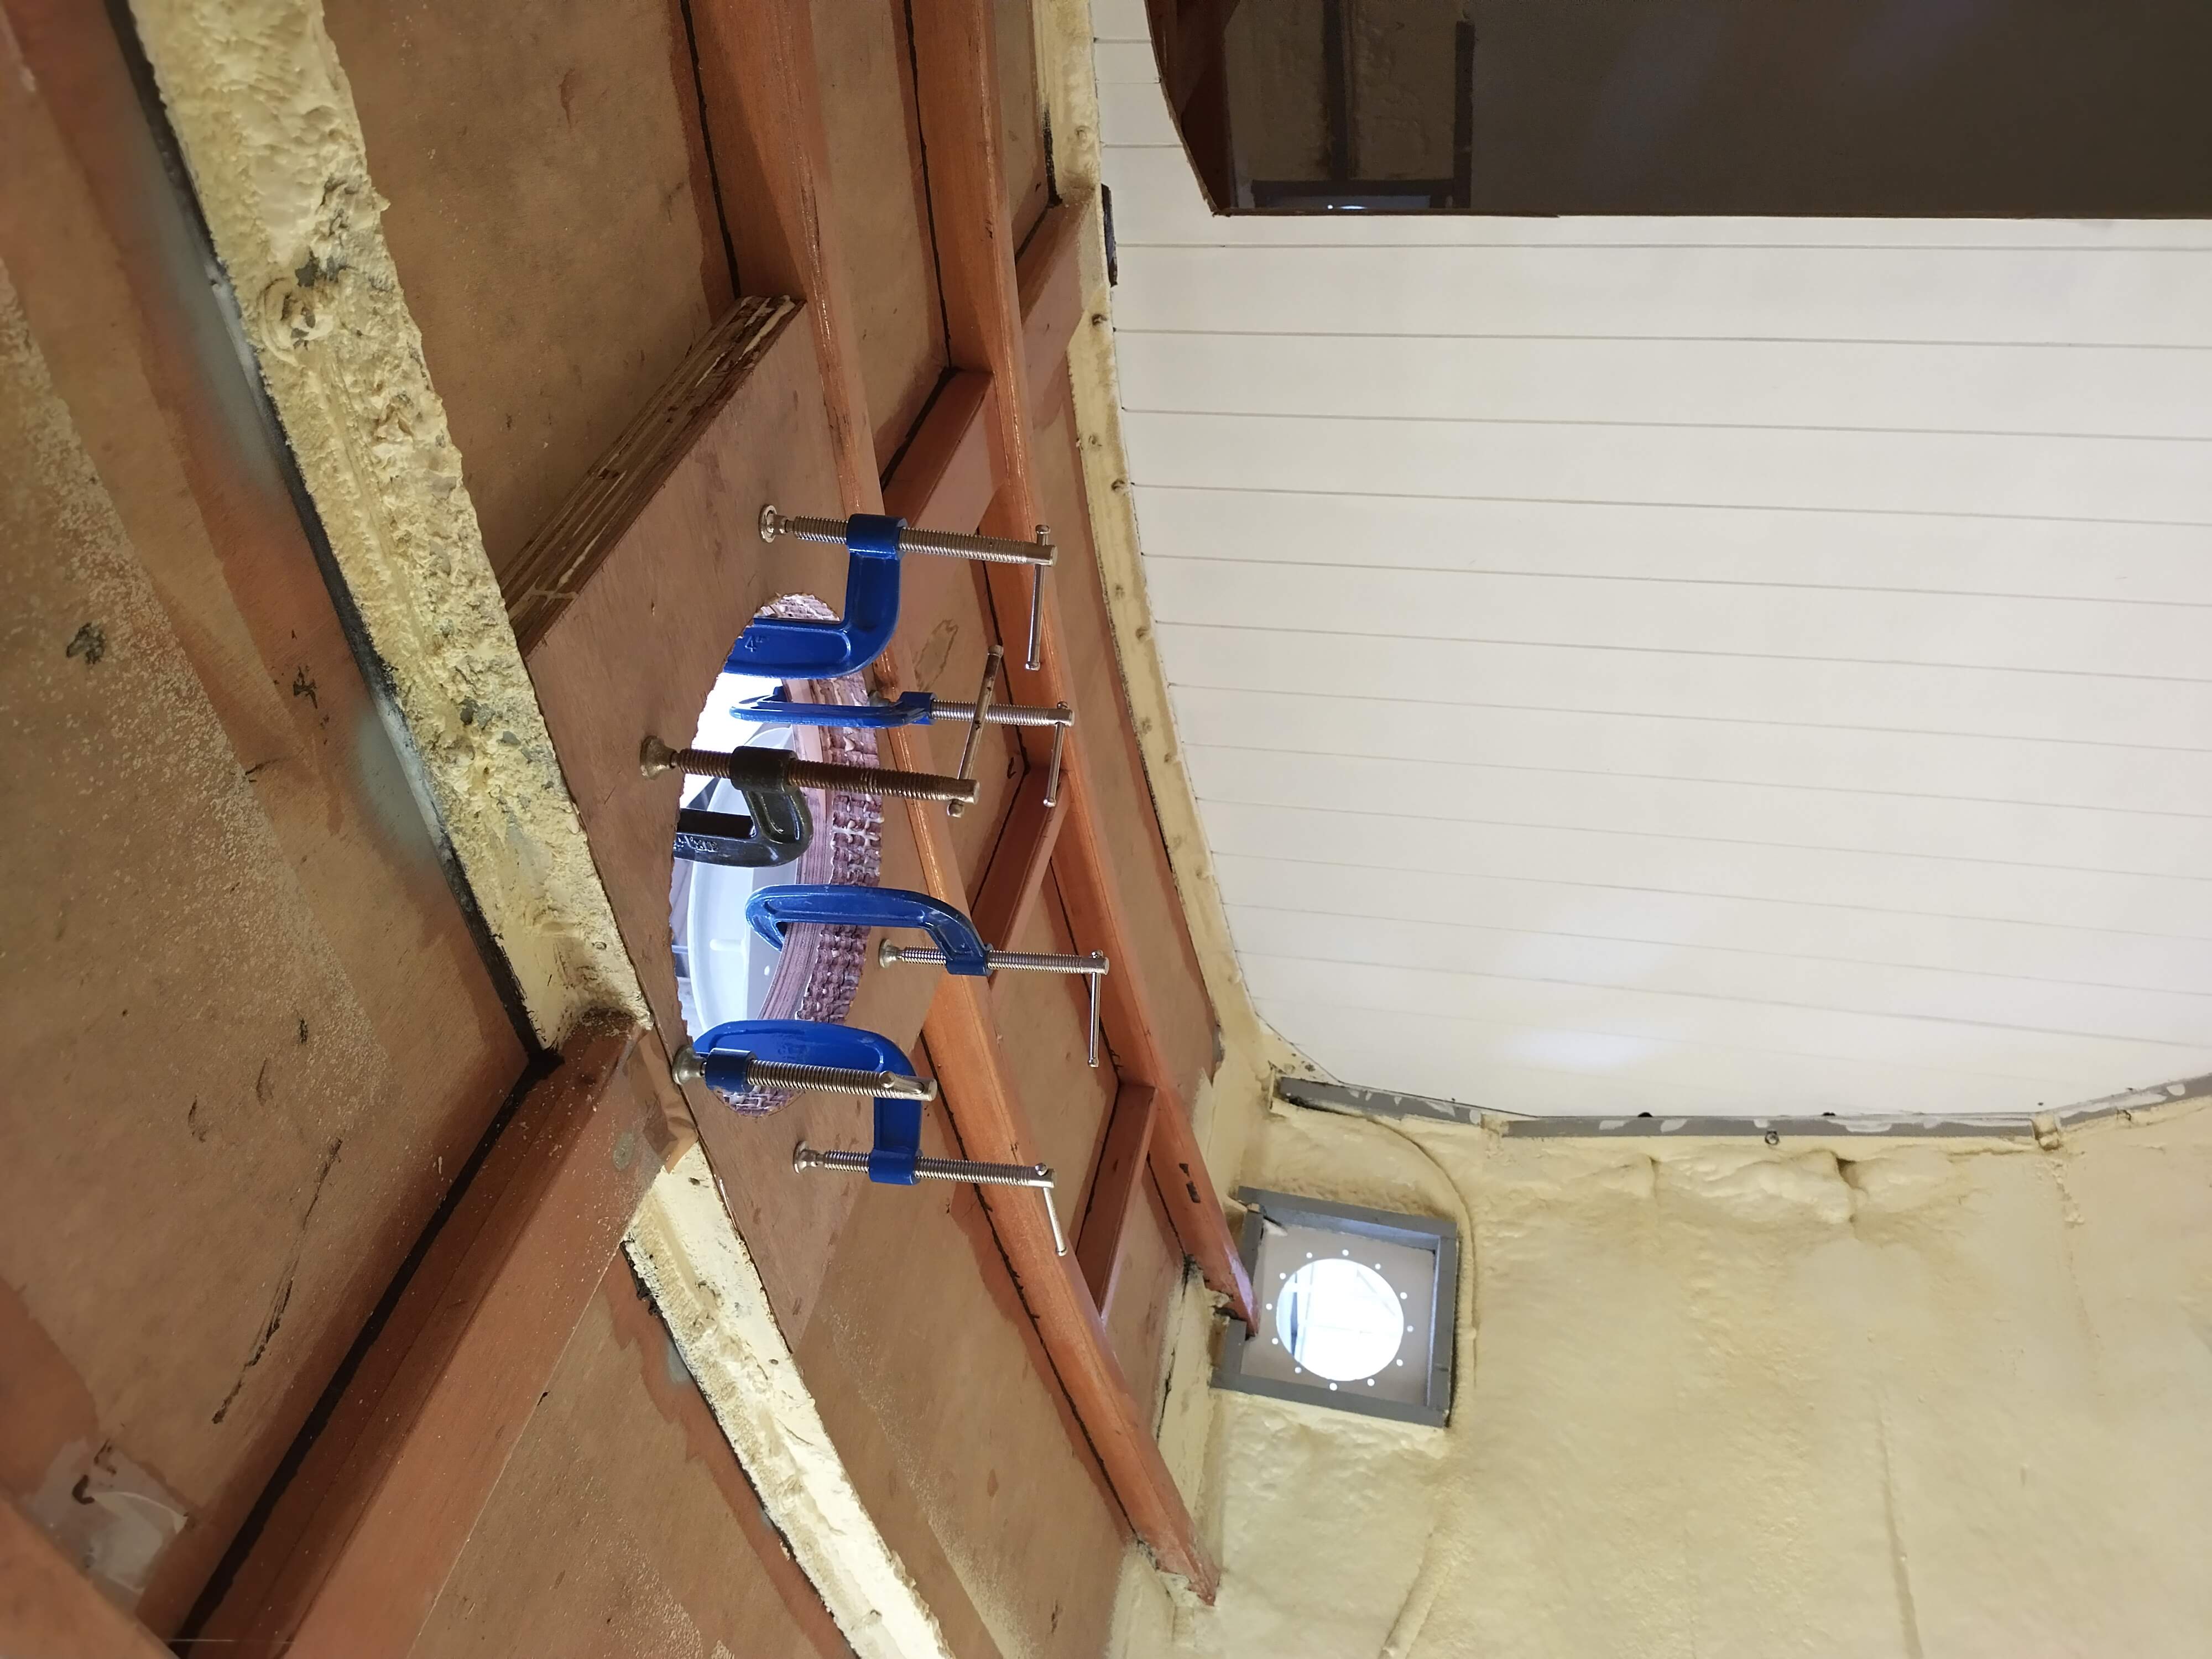
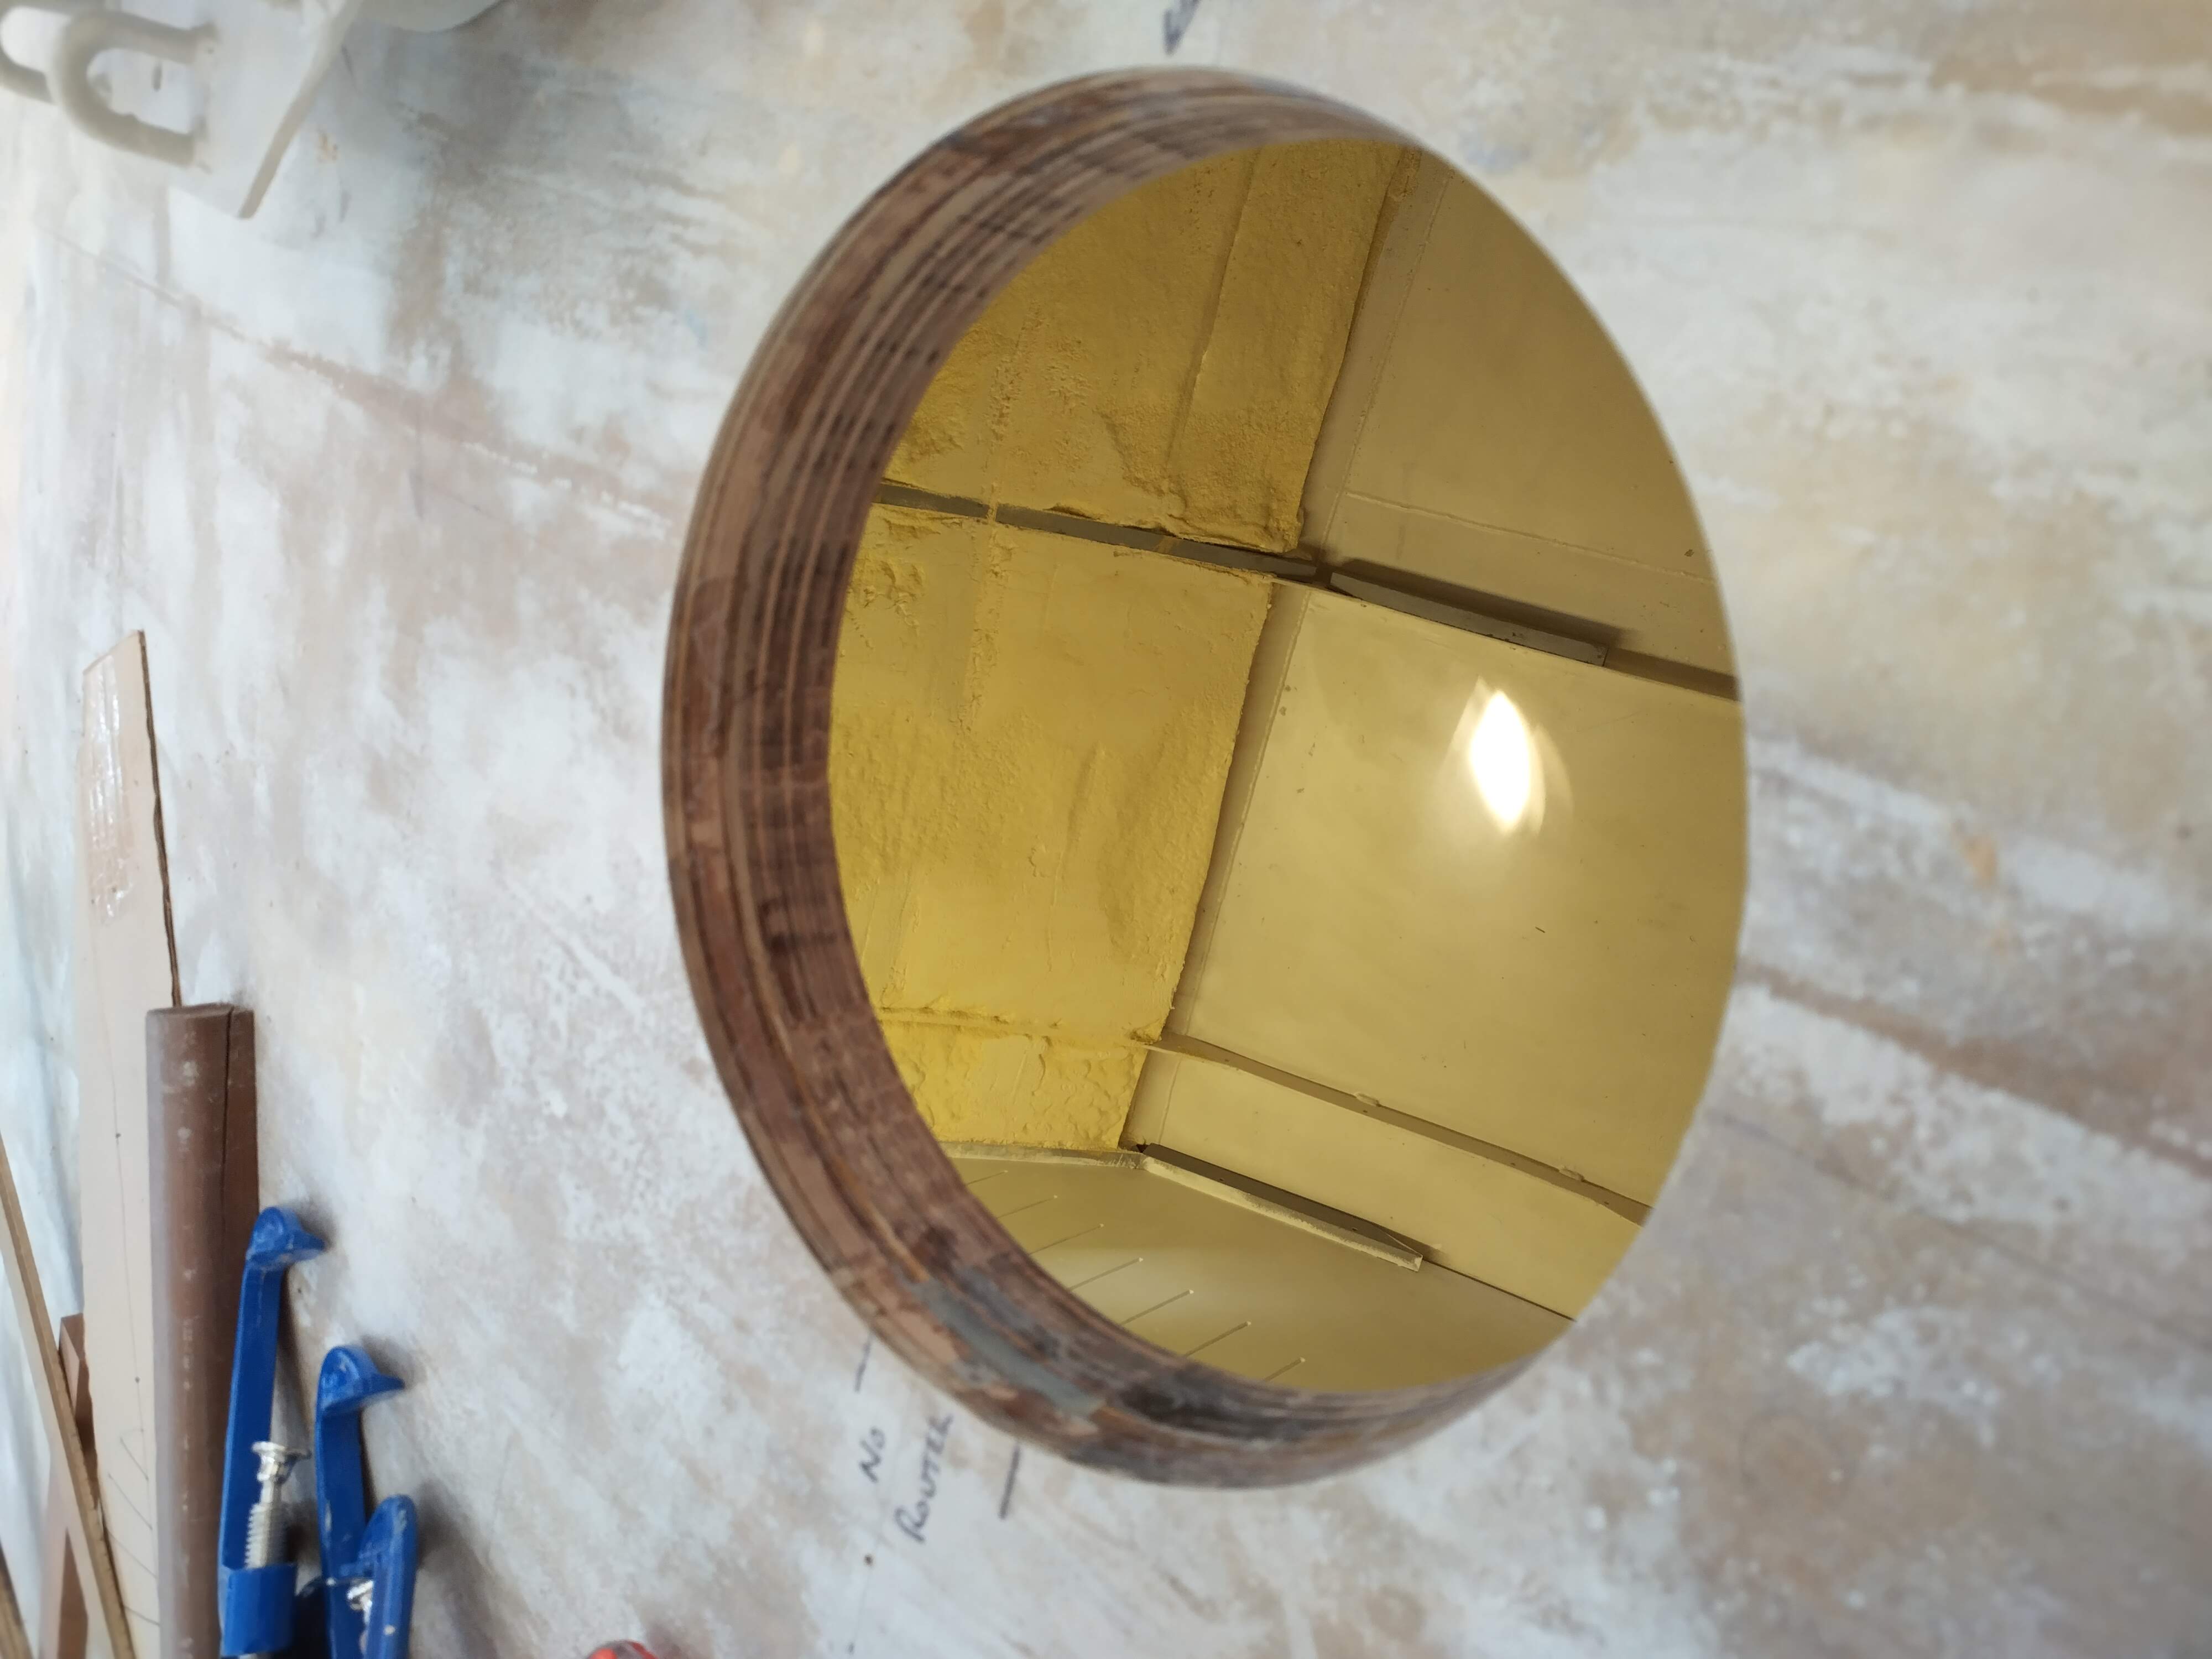
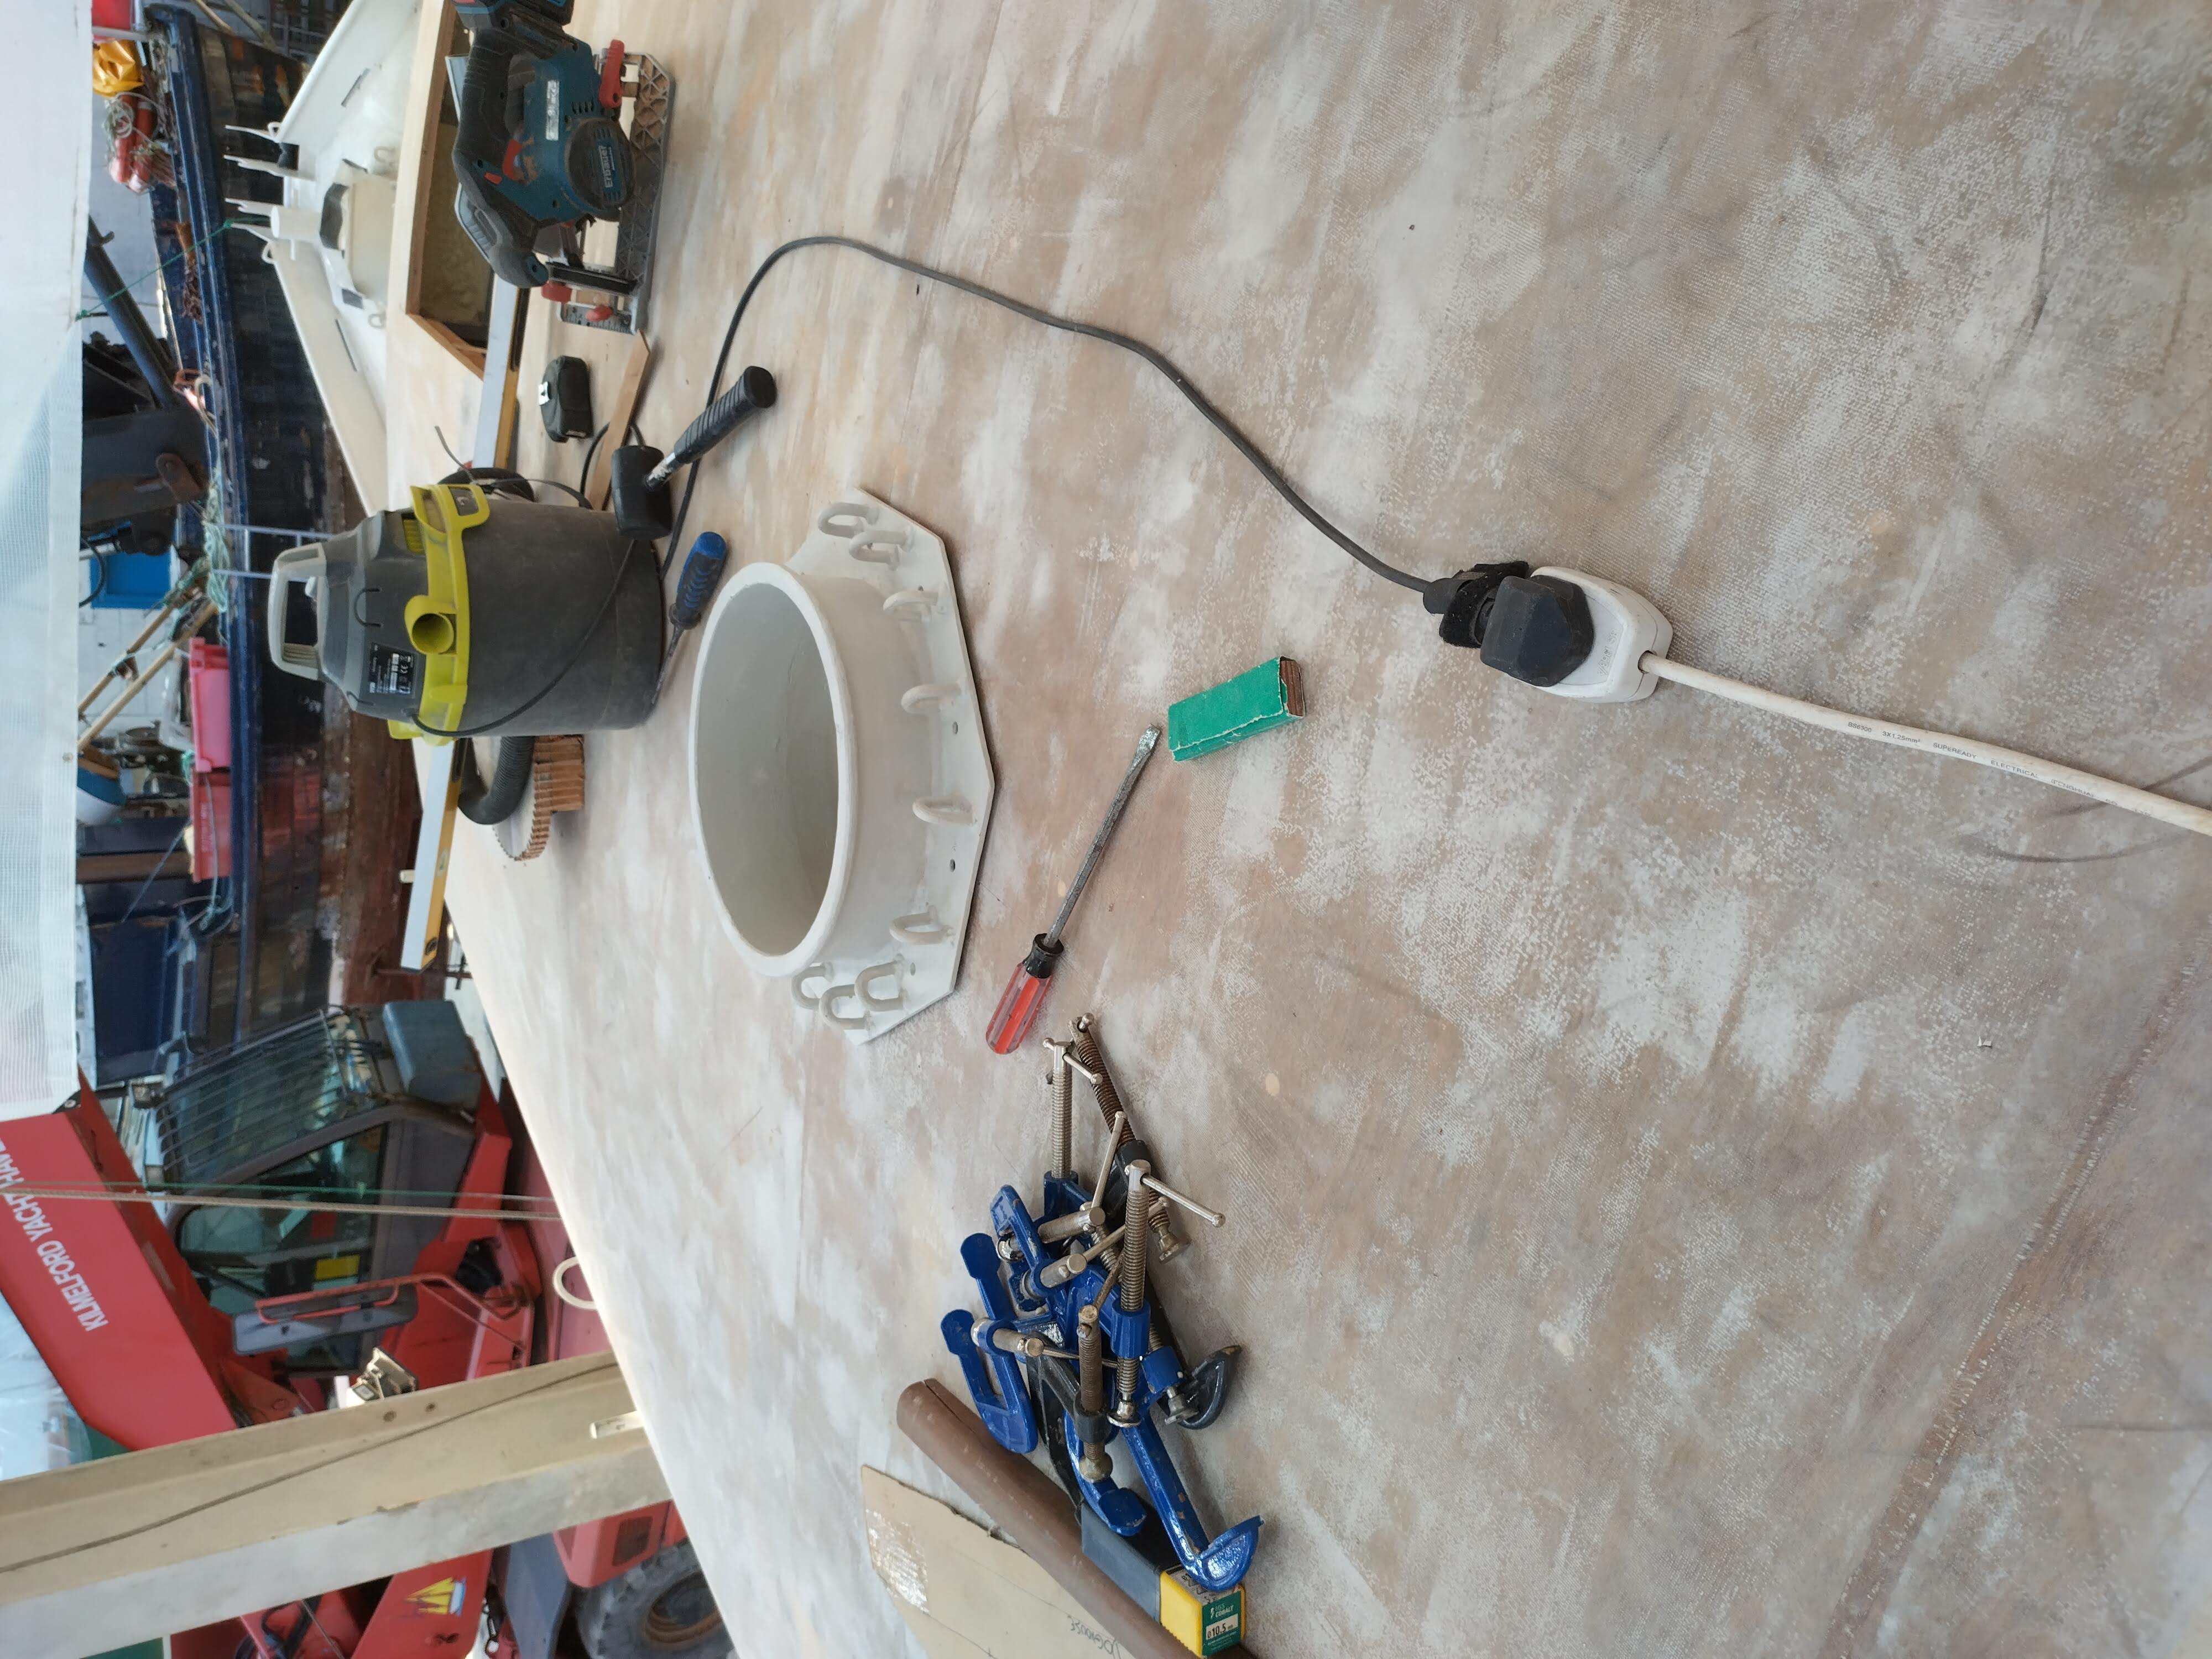
This almost brings us up to date. The final couple of things I have been doing up until I rejoined VIC 32 on Sunday were the slightly nerve-wracking tasks of cutting the holes for the mainmast and the forehatch. I did the mainmast hole first, having some time previously (in fact, before laying the second layer of ply on the deck) found the centre of the hole (with which I had aligned the steel mast step I fabricated all that time ago during COVID!). I marked out the circumference of the hole according to the diameter of the collar (again, my steelwork, making one good one out of the two which had previously been cut out), and drilled around the inside of the circumference line. During drilling I found that there was a steel tongue set into the wooden deck centreline beam from the steel deck beam aft of the hole. For this small (3 inch) section, I had to use the reciprocating “Tyrannosaw” to cut the steel, which succumbed surprisingly easily. Then for the remainder I used my jigsaw to join the dots, only finding one screw on my way round, which I later dug out before using the router to trim the hole to the line (using a circular template I had previously cut, also with the router, using the arc guide). The steel tongue needed to be revealed from the timber surrounding it, so I delicately chipped away with my second-best chisels, and then used the grinder to grind the tongue back flush with the wood. The next job was to cut out four matching layers of ply which I then laminated to the curve of the deckhead before bonding in place as a reinforcing block around the hole. All the edges were then liberally smeared with low-density epoxy filler, to seal the raw ply, and the inside faces of the block trimmed and sanded nicely. Once I’m home I will then have to cast a thin base on the upper deck surface to ensure that the collar flange has a proper seat to bolt and seal to – this will be a fun and potentially messy job with more thickened epoxy!

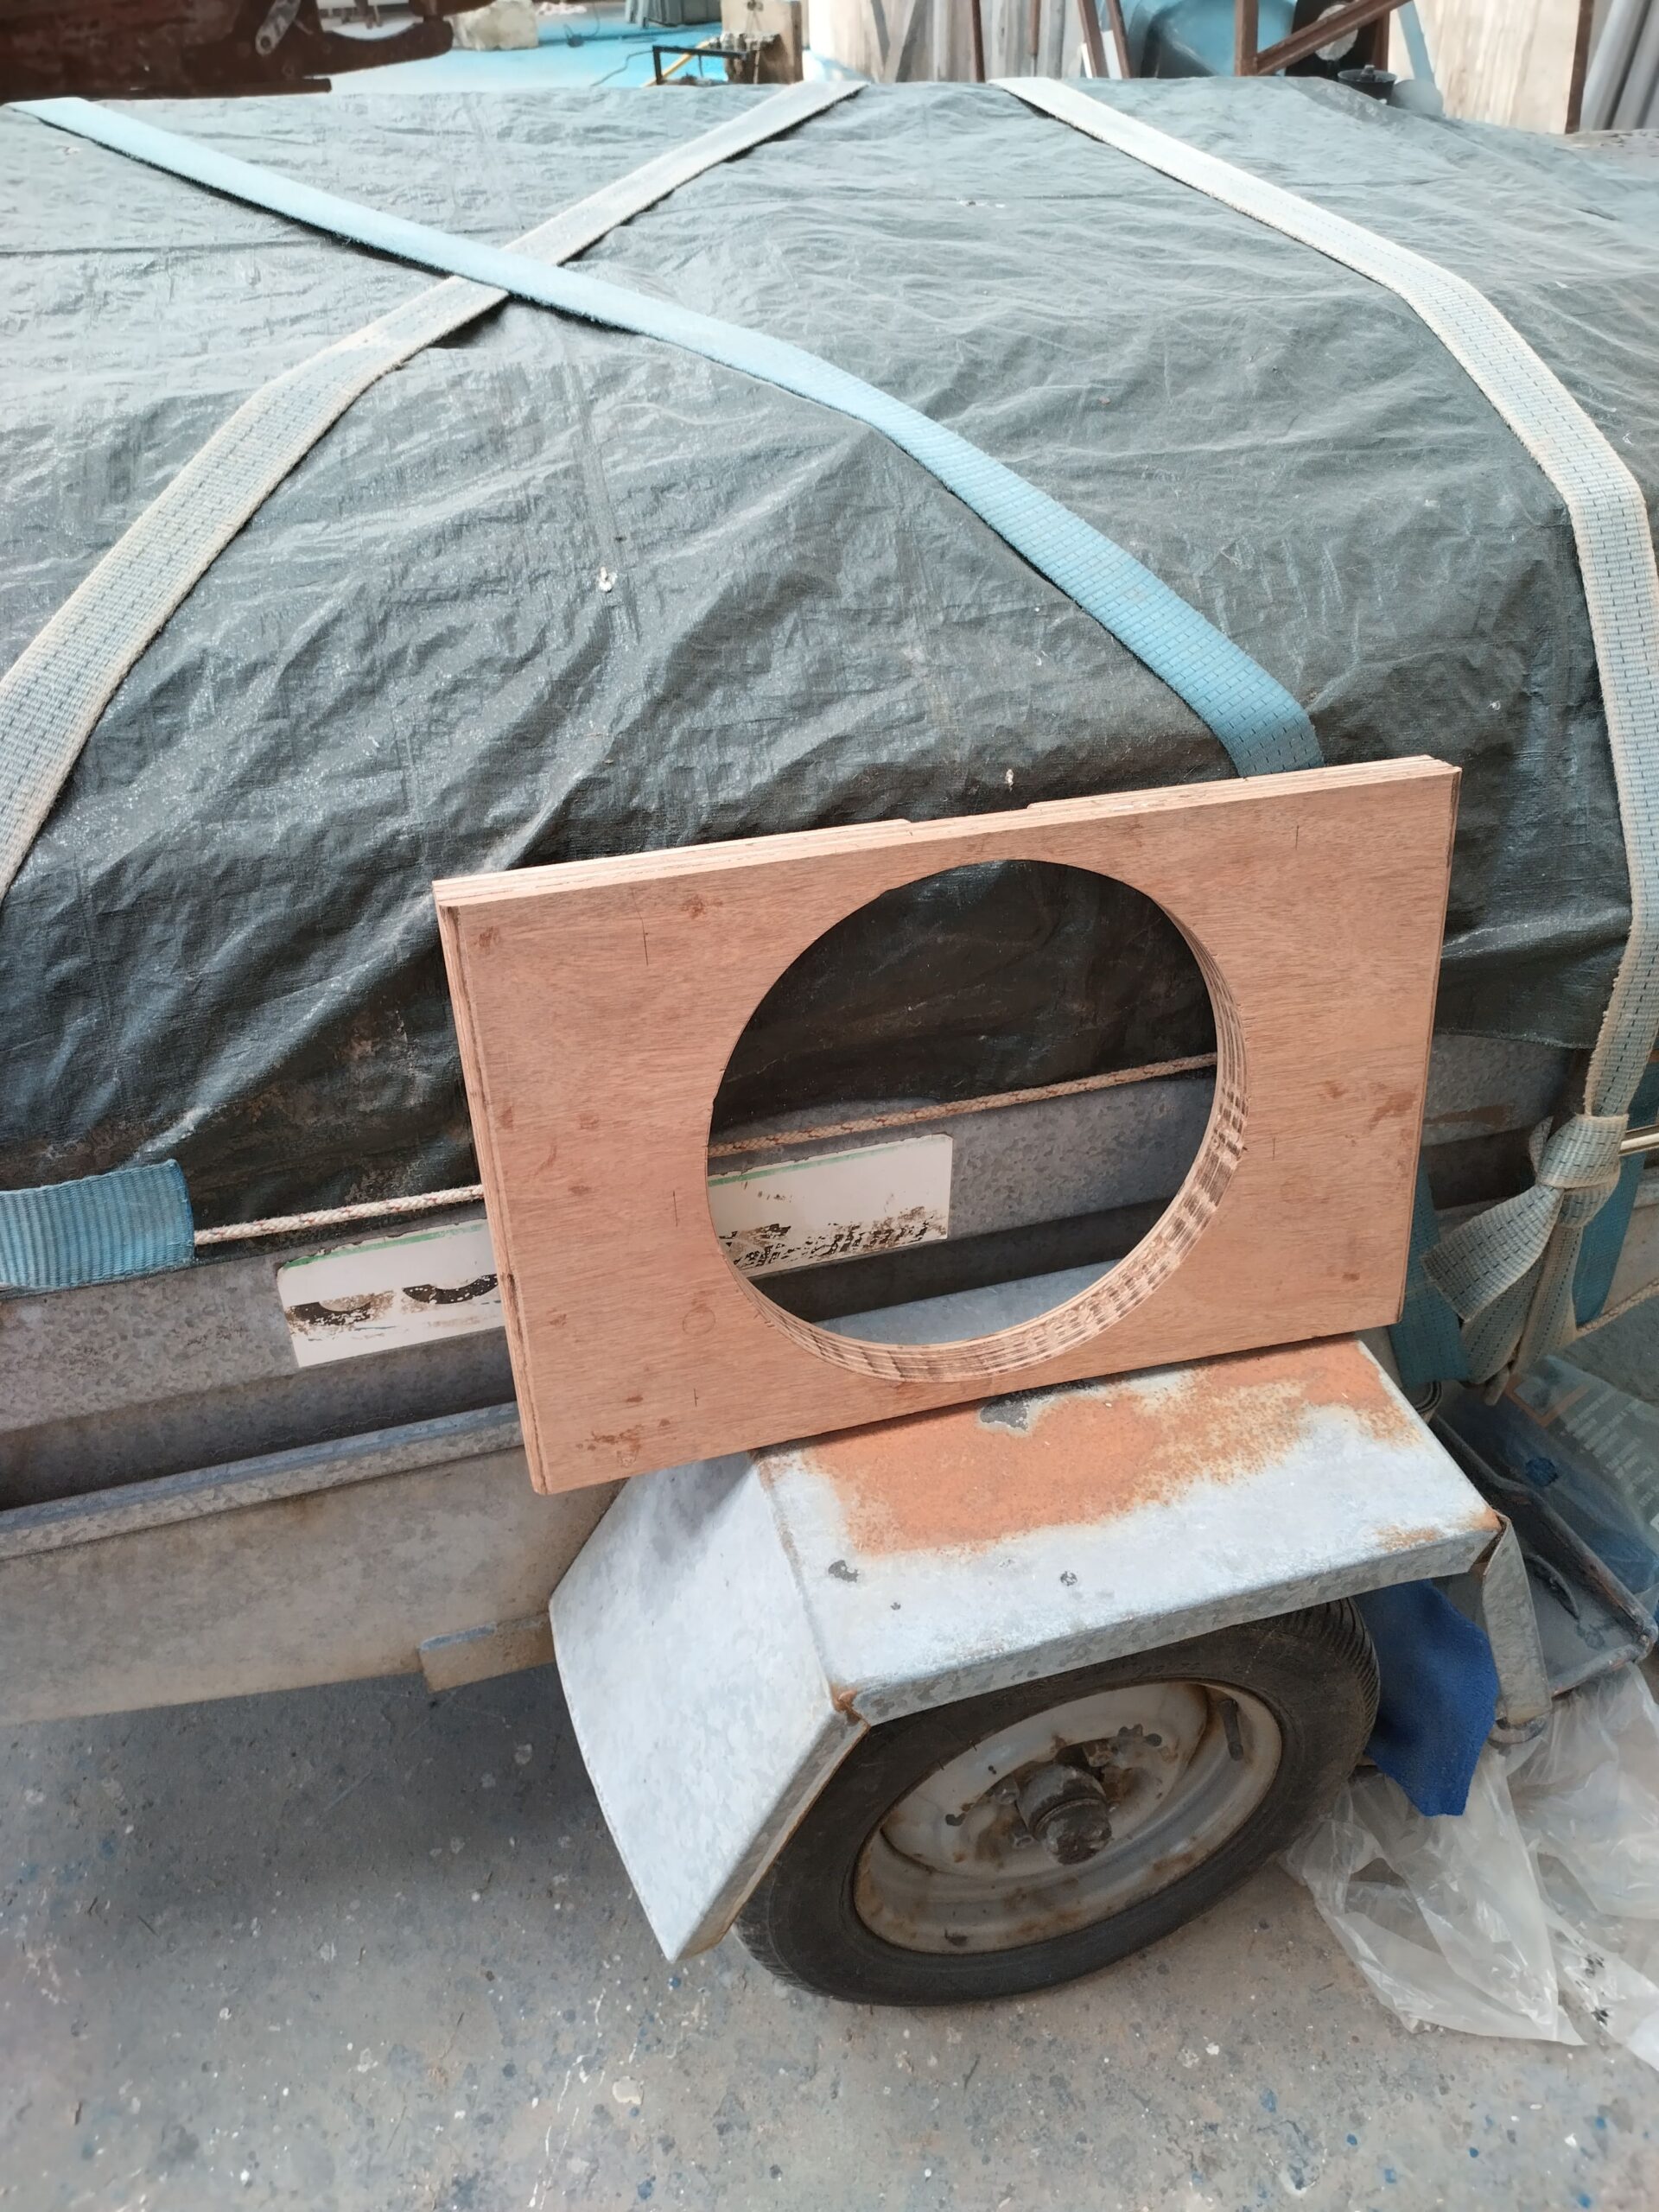
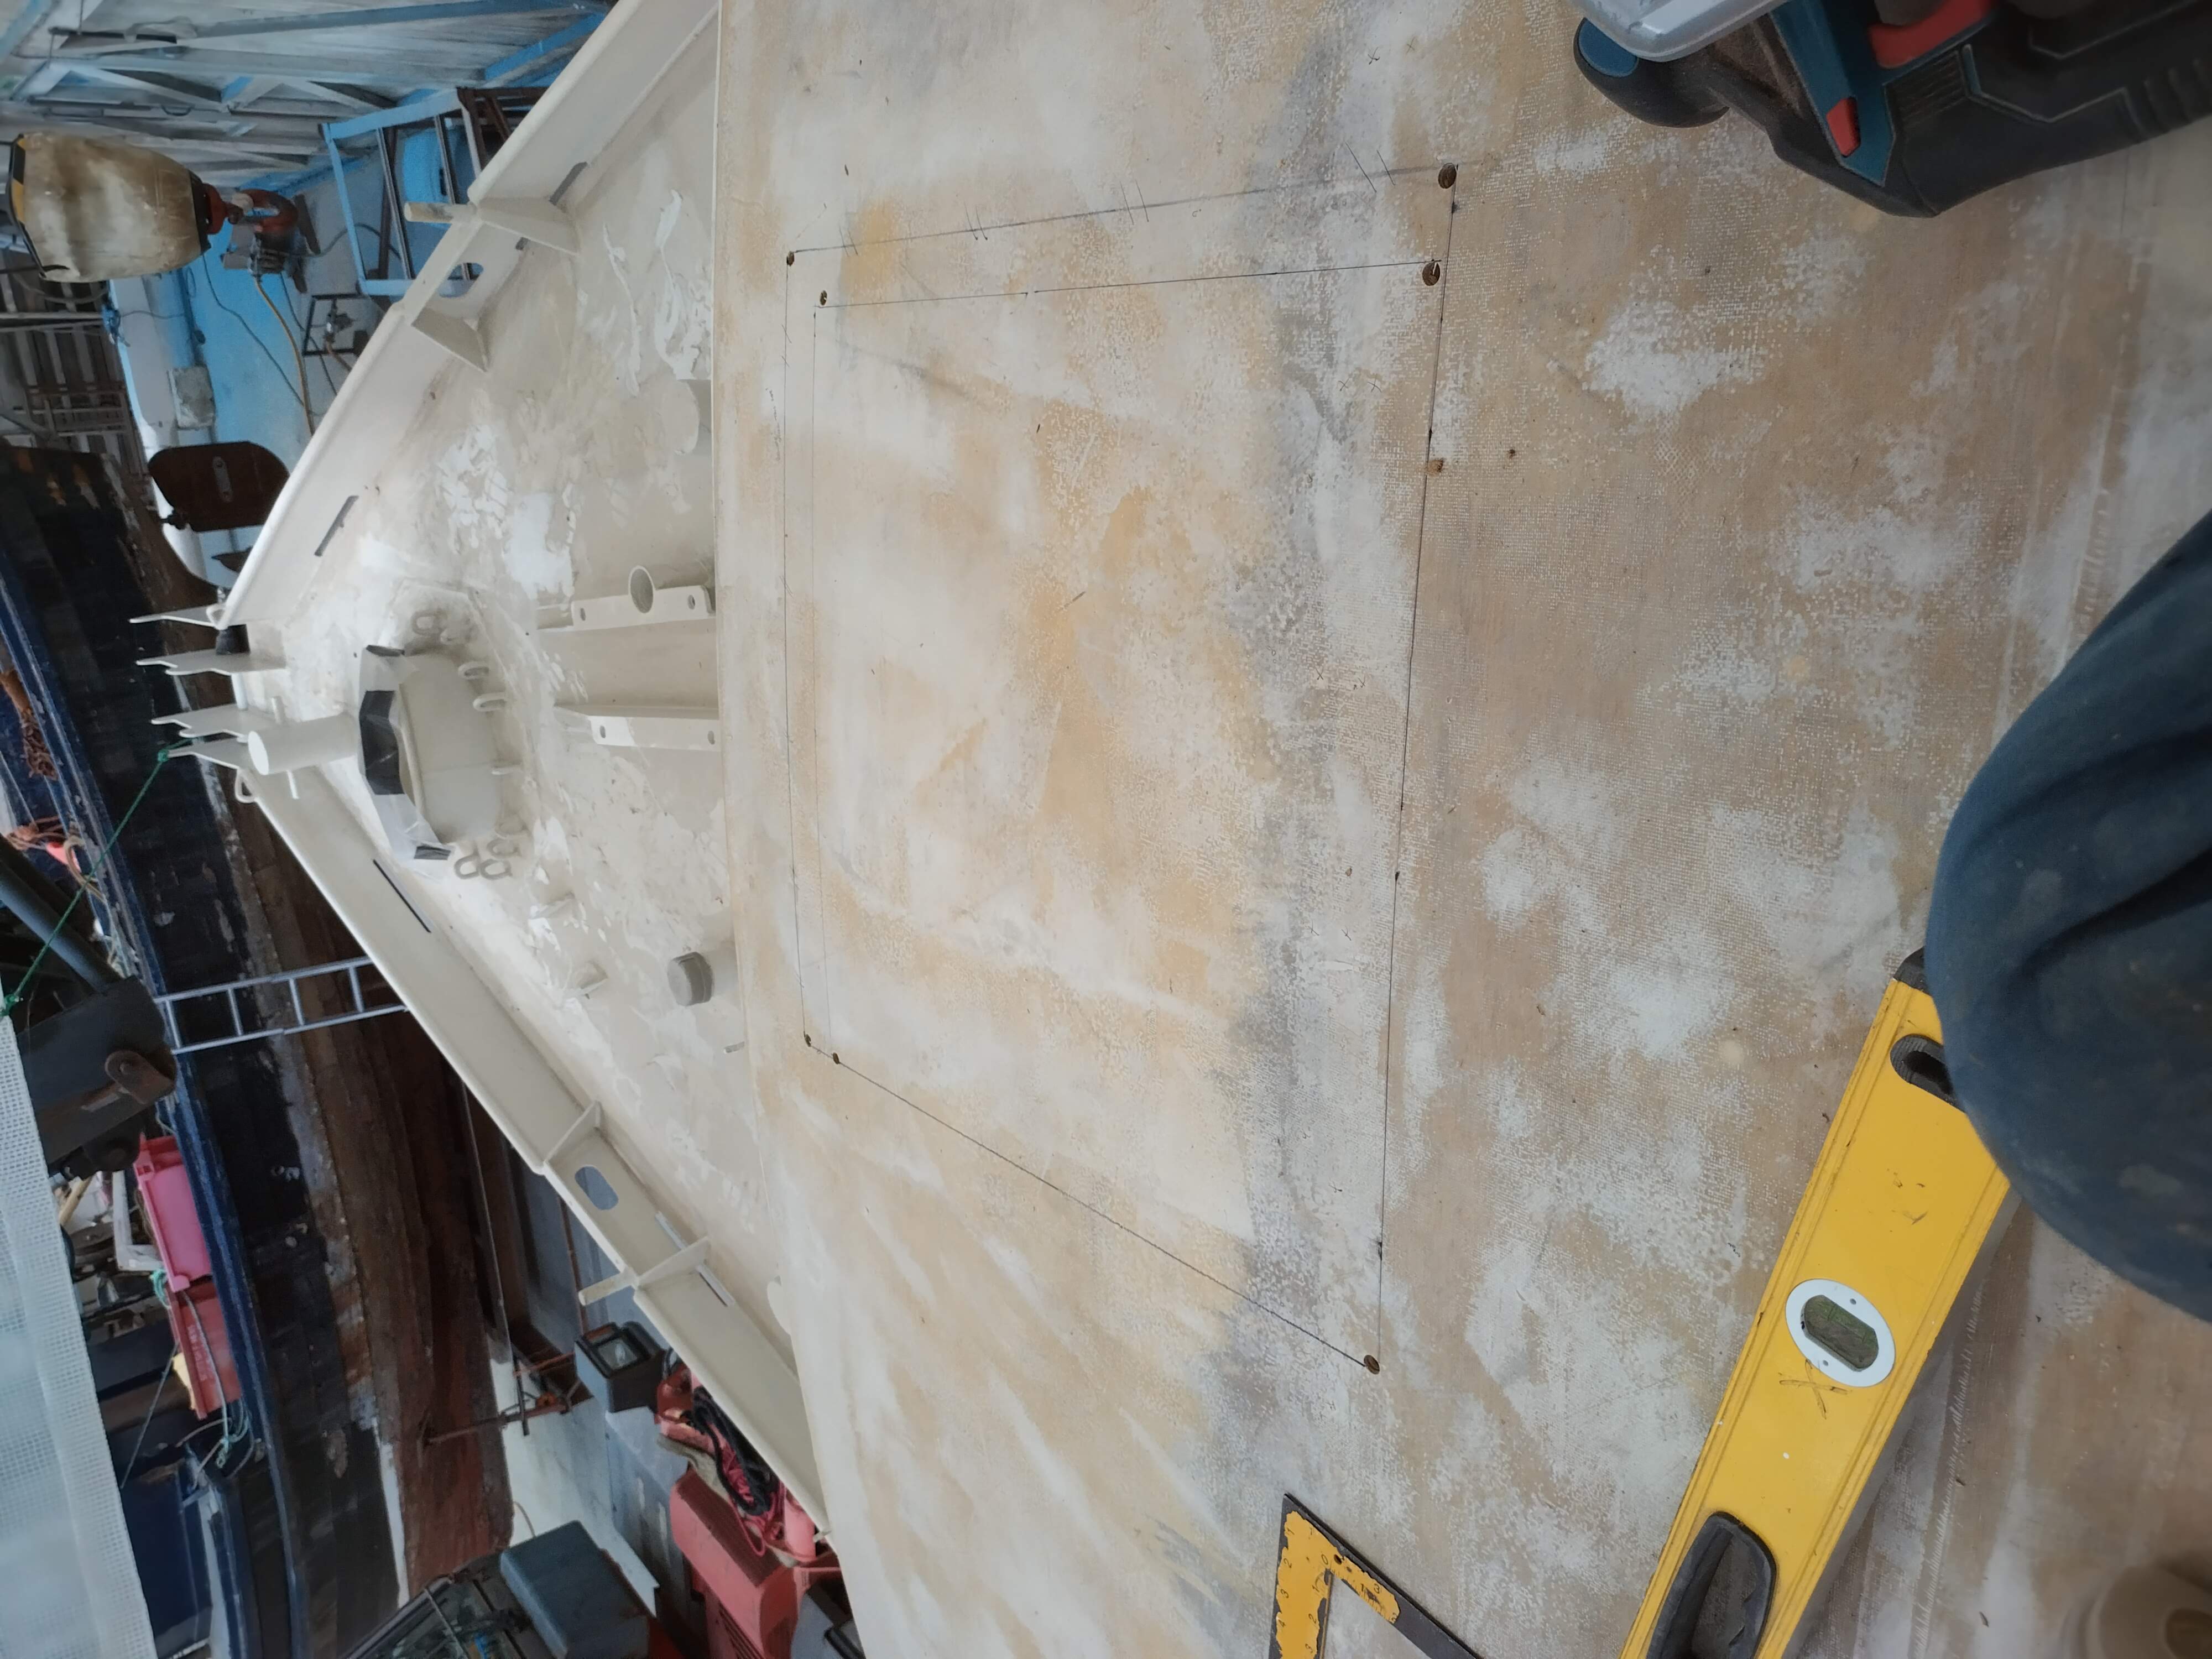
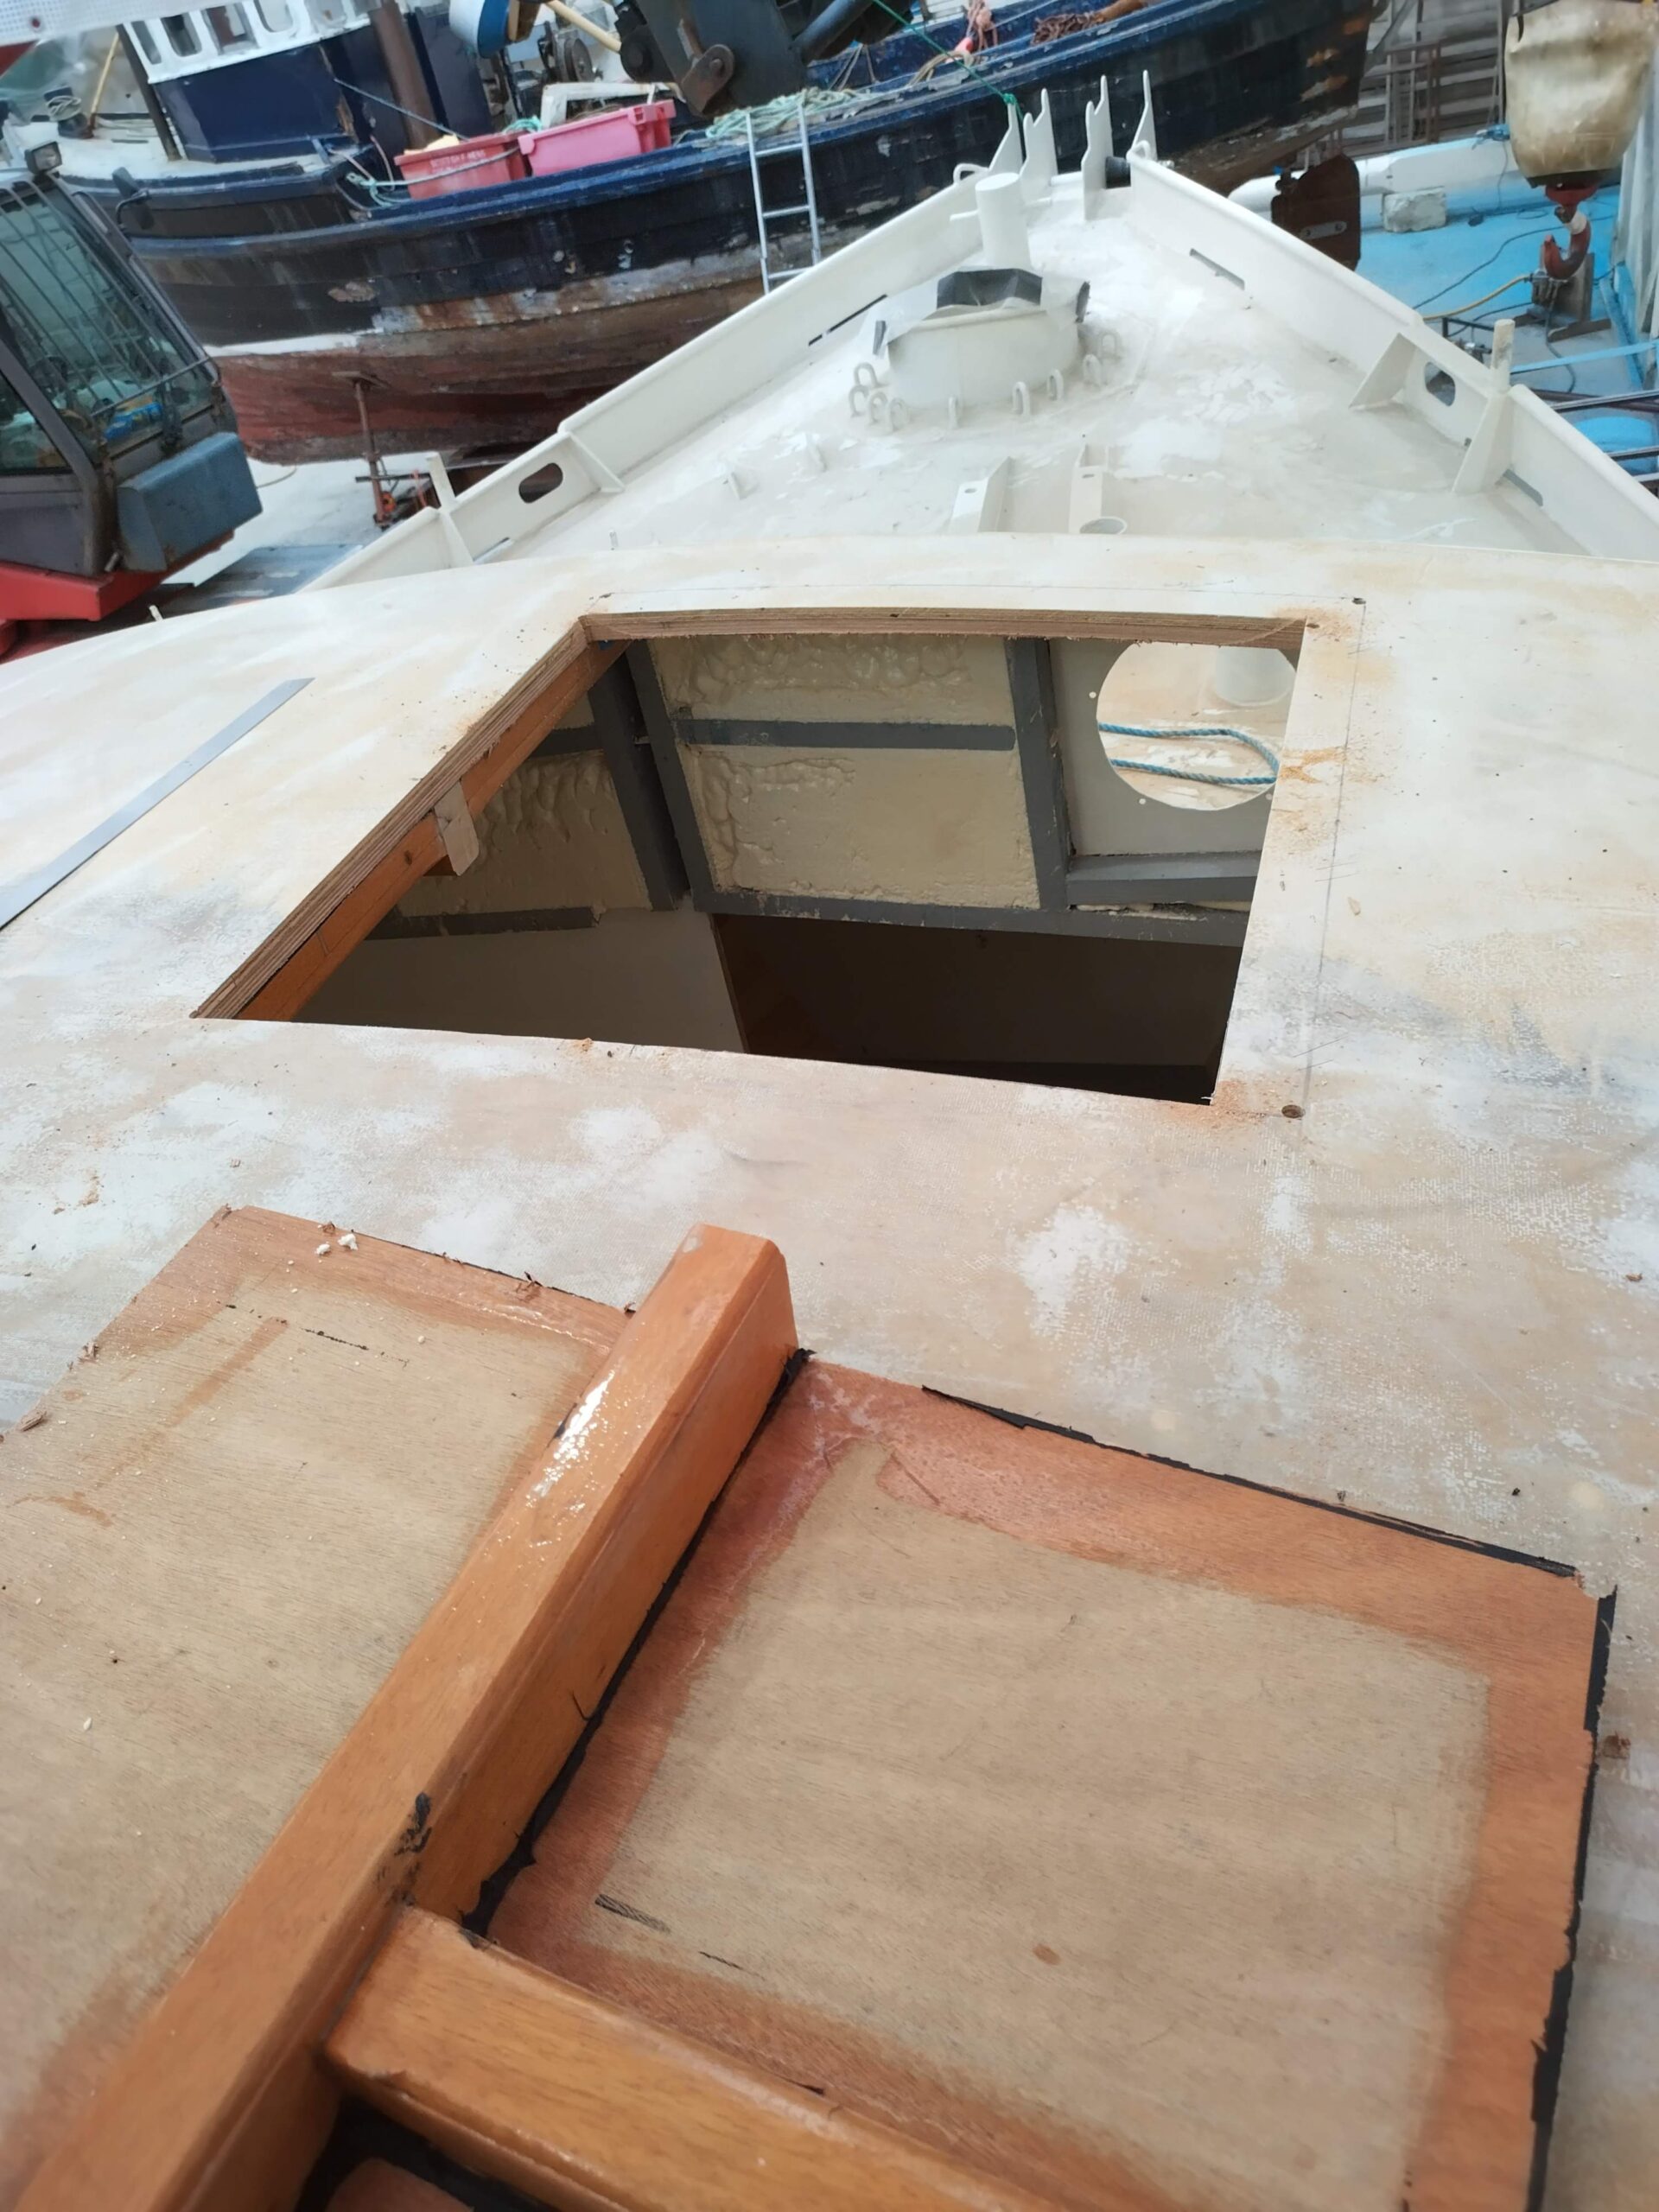
Finally came the cutting of the forehatch aperture. Having decided on the final desired dimensions of the opening, I marked the hole allowing for the lining timber and hatch carlines, but not before marking and drilling the wrong size first! Fortunately the drill holes were easily refilled with epoxy, and holes drilled in the correct place to mark the corners. I then used the circular saw to cut the sides of the hole as straight as possible, and finally a hand saw to cut the remaining tabs at the corners, whereupon the cutout dropped out neatly and under control. My next task will be to make and fit the carlines and line the aperture, possibly going as far as to fabricate the hatch lid as well, making a complete hatch. We shall see, and I will provide details in the next post. That’s all for now – hopefully I can write more before I rejoin Scenic Eclipse II in early September…
Cheers for updates Chris. As I’ve said before, I really enjoy reading them.
I’m also happy that some lucky VCS are going to enjoy your company on board Tenacious. Have fun.
Thanks Colin! I’m happy someone is reading them!
Chris, outstanding workmanship! Congratulations on your mast purchase….that’s a great find and as you stated a huge time saver! Speaking of “time” do you have an idea of how many work hours you have so far completed? Also an estimate on how many hours of work you have remaining?
Hi Steve,
Thank you, and thank you! I haven’t dared tot up the work hours so far, or indeed the ££££s I have spent, although it should be reasonably easy to work out the former, as I have to sign in and out of the yard when I’m working on the boat! This would not include the hours before I moved the boat from Balvicar to Kilmelford of course, but most of that was temporary stuff just to make her float and move. I may do some sums when I next get home from sea; in the meantime watch this space as there’ll be another update coming soon. As for hours remaining – again, not something I’ve thought about too hard, but I have a vague goal of getting to some sort of milestone in my fiftieth birthday year in 2025.